安卓APP开发基础

 最新推荐文章于 2021-12-26 00:19:18 发布
 阅读量1.5k
 收藏
47
收藏
47


 点赞数
4
点赞数
4

目录
- 安卓工程构建第一个APP运行
- 安卓的工程目录文件夹介绍
- 安卓APP启动过程
- 安卓布局控件
- 布局的种类
- 布局和页面的关系
- 显示一张美女图
- 显示两个美女
- 常用布局之相对布局
- 基础控件之Button,TextView,EditText,ImageView, padding和margin(内外边框)
- 相对布局综合小演练-智能家居刷卡界面
- 按键美化
- 常用布局之线性布局
- 介绍
- 线性布局orientation、weight、gravity、divider属性
- 安卓按键响应的几种方式
- 在xml中设置按键的onClick绑定的函数
- 自定义类实现按键监听事件的接口
- 匿名内部类实现按键响应
- Activity实现click接口
- 安卓页面跳转
- 为安卓添加多个页面
- 页面跳转方法
- 页面跳转传参
- 安卓线程实现页面若干秒后自动跳转
- Activity(页面)的生命周期
安卓工程构建第一个APP运行
嵌入式学习安卓目的其实是为了掌握简单的安卓APP开发,最重要的目的并不是为了开发APP,而是为了了解APP开发的整个过程,方便为安卓开发工程师提供SDK包,也就是如何在手机APP上实现点灯等控制硬件的一系列操作。
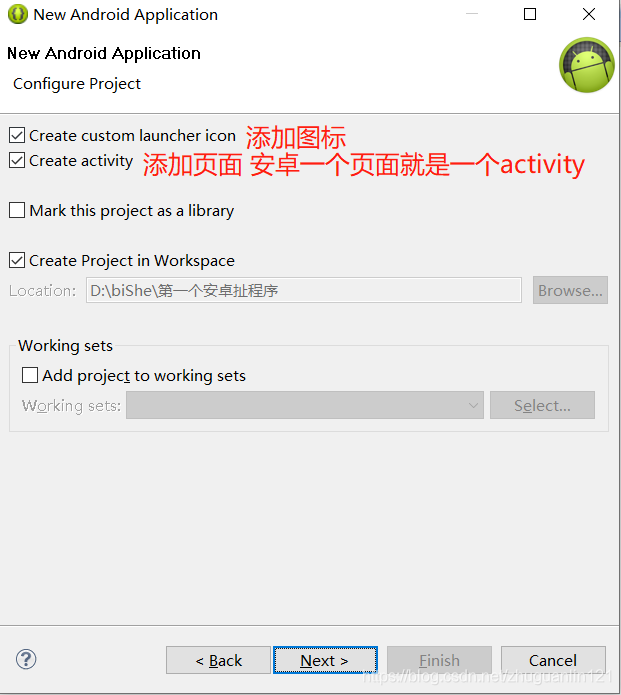
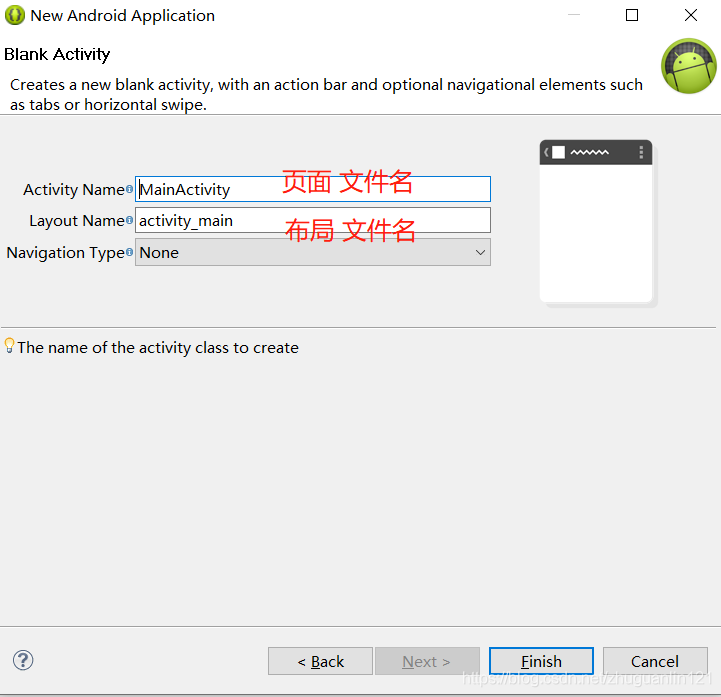
点击Finish,程序构建完毕。
如何启动这个程序?由于自带的模拟器启动较慢,我们先去下载夜神模拟器(或者mumu模拟器,我是用的这个),运行。
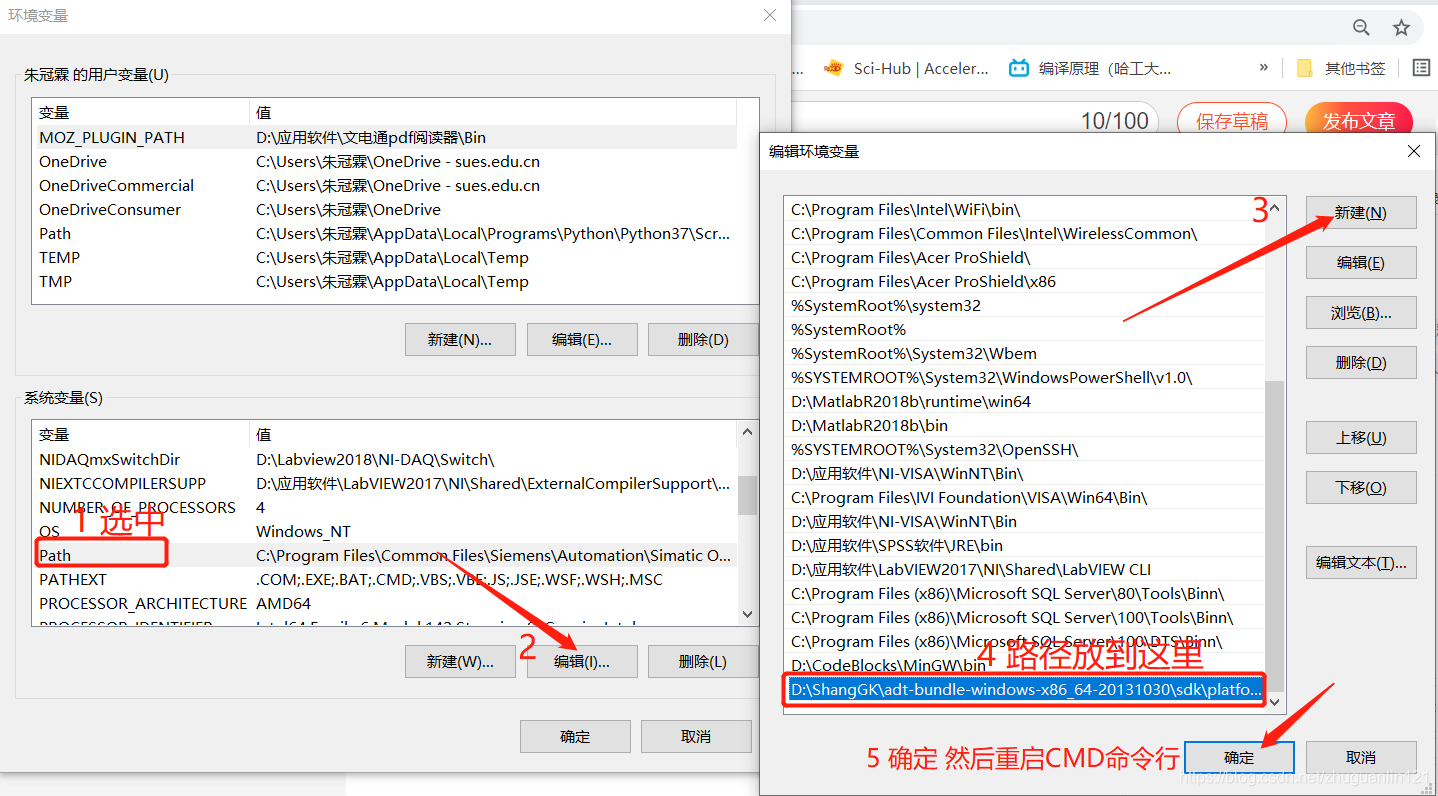
eclipse和夜神建立连接之前,需要配置adb的环境变量(因为我们要在Windows的命令行终端使用这个指令):
找到之前我们安装eclipse的路径,找到adb.exe,如下图所示
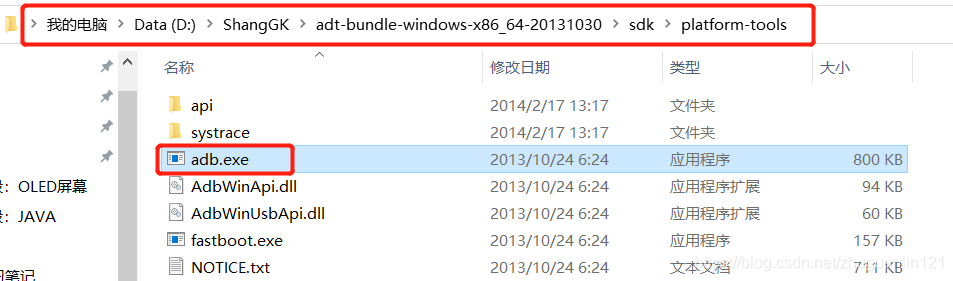
复制这个路径,打开Windows环境变量配置界面(右击我的电脑,属性,高级系统设置,环境变量)
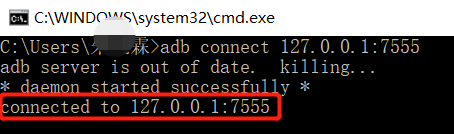
eclipse和mumu模拟器建立连接命令:
adb connect 127.0.0.1:7555
连接成功:
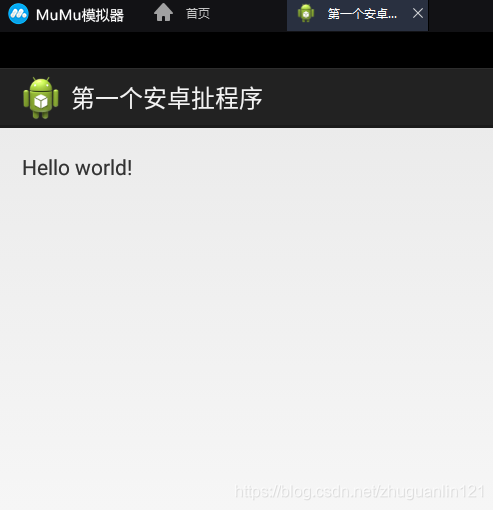
运行,工程名字上右键,run as android appclication,发现mumu模拟器出现运行界面。

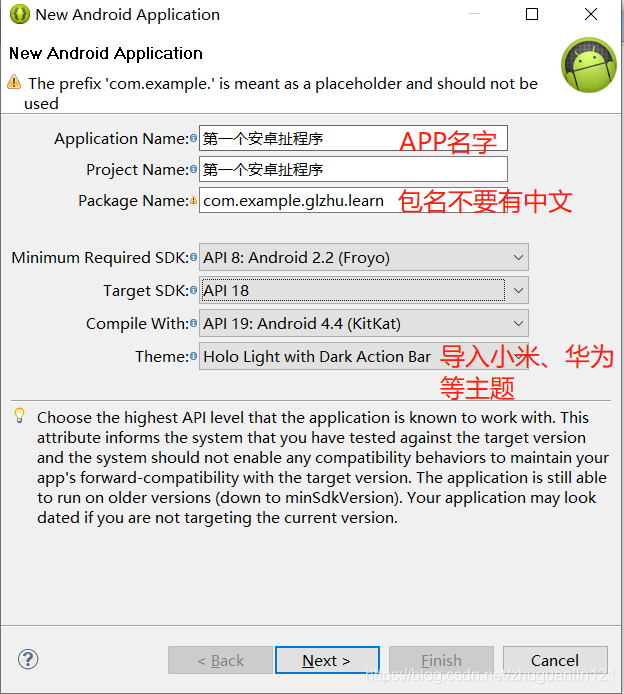
- 构建容易,包名不能包含中文
- 模拟器一般用夜神和mumu,eclipse和夜神建立连接adb connect 127.0.0.1:62001 (127.0.0.1是网络本地地址,也就是连接自己,夜神模拟器的端口号是62001,mumu模拟器端口号是7555)
- 连接失败要重启adb adb kill-server adb start-server
- 运行,工程名字上右键,run as android appclication
安卓的工程目录文件夹介绍

-
src: 存放java代码的,有包,有文件
-
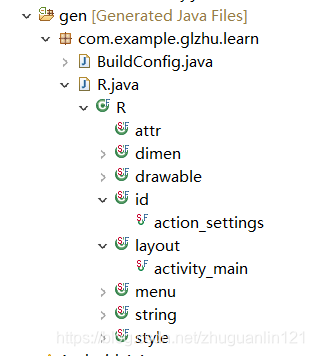
gen: 存放自动生成的文件,关心里面的R.java,保存程序的页面,按键,文本等控件的ID,它是自己生成的
-
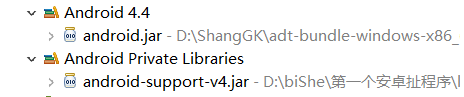
Android:4.4: 存放安卓开发的一些库(UI、蓝牙等),供开发者调用
-
asserts: 存放一些资源,配置文件,图片
-
bin: 编译后会生成的一些文件,包括我们关心的apk
-
libs: 依赖库
-
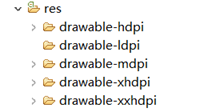
res:
*drawable前缀:存放app程序要用到的一些图片(高分辨率、低分辨率等)
*layout: 存放布局文件的文件夹
一般一个activity(安卓页面)对应一个布局(可以拖拽和编程实现界面布局,复杂界面最好采用编程方式,避免出现界面变形,QT也存在这个问题。)


*values: 存放一些参数,或者自定义控件的文件 -
AndroidMainfirst.xml: APP的配置
*权限:网络访问权限,名片夹访问权限,相机访问权限
*目标机器SDK版本
*APP的名字
*APP的图标
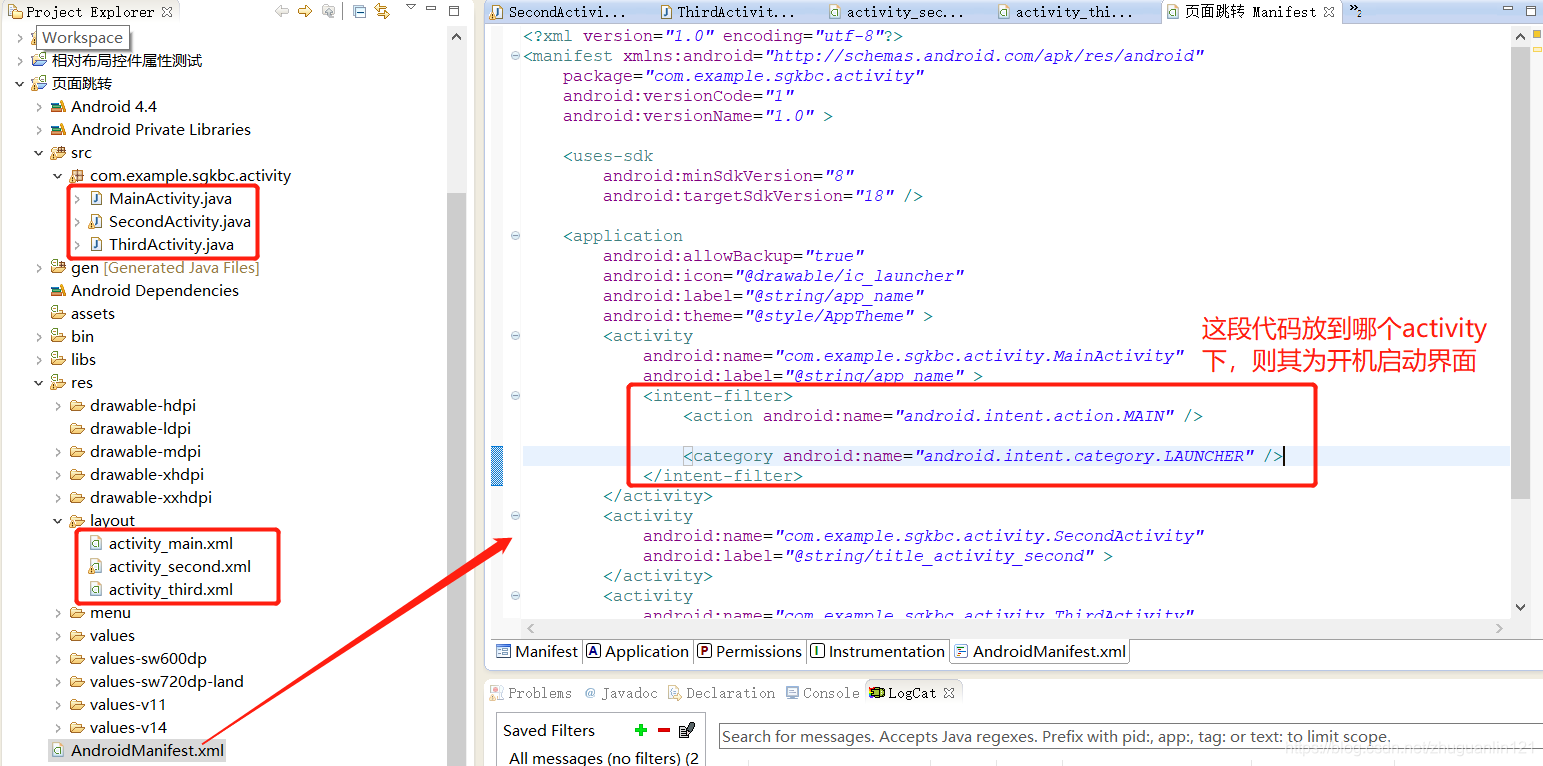
*配置第一个被加载,启动页面
安卓APP启动过程
Laucher(不断检测屏幕触摸)->Androidmanifirst.xml->lauch标签的activity被加载->oncreat被调用->java关联xml布局页面->显示->等待用户触摸等操作
详细参照博文: https://www.jianshu.com/p/4d199e96ec60
安卓布局控件
布局的种类
详见 https://blog.csdn.net/wenzhi20102321/article/details/52677595
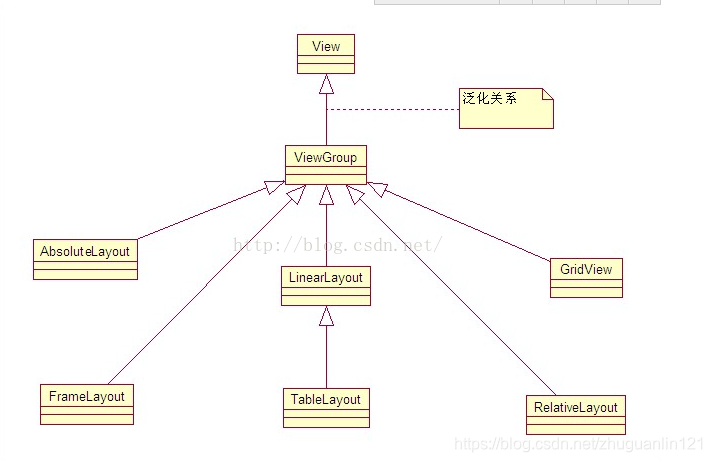
布局和页面的关系
显示一张美女图
将提前准备好的图片,选中复制,粘贴到下图目录下。添加一行代码,将图片成功添加到APP中。
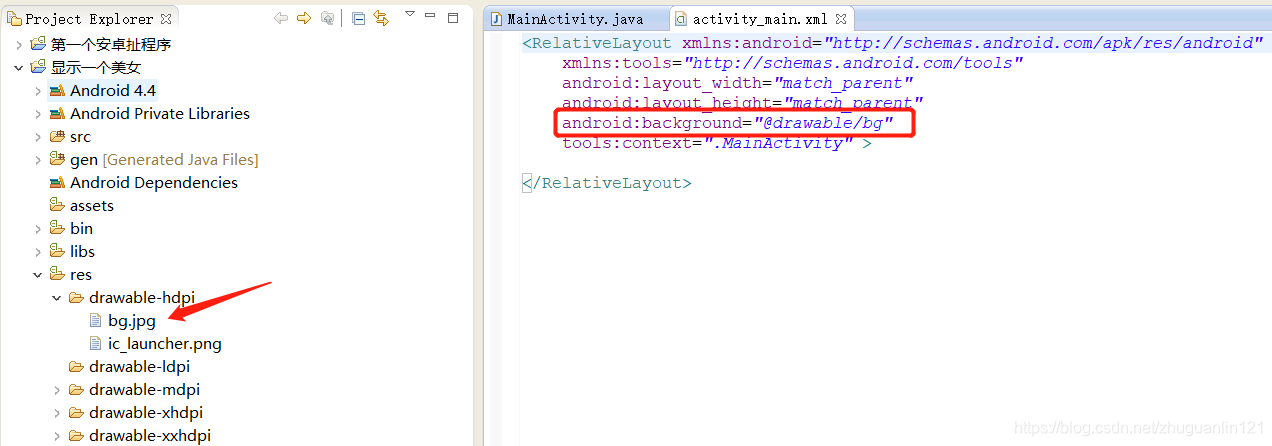
activity_main.xml
<RelativeLayout xmlns:android="http://schemas.android.com/apk/res/android"
    xmlns:tools="http://schemas.android.com/tools"
	android:layout_width="match_parent"
	android:layout_height="match_parent"
	android:background="@drawable/bg"
    tools:context=".MainActivity" >

</RelativeLayout>

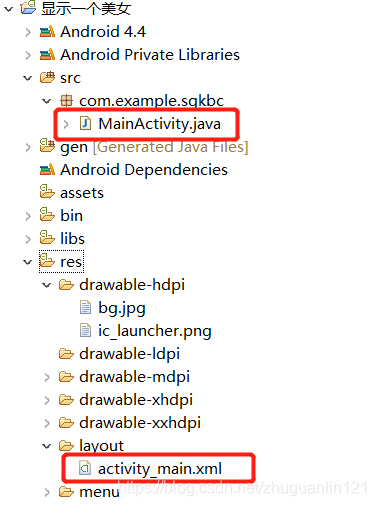
将别人的安卓工程源码导入到eclipse中的方法:
file->import->选中整个文件夹,如下图所示
打开后相应的代码:

显示两个美女
引入ID、below(指定ID位置下方)的使用方法。
布局关系:
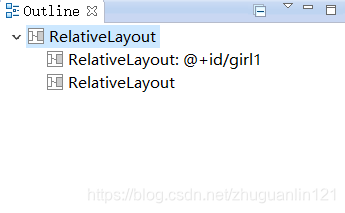
activity_main.xml
<RelativeLayout xmlns:android="http://schemas.android.com/apk/res/android"
    xmlns:tools="http://schemas.android.com/tools"
	android:layout_width="match_parent"
	android:layout_height="match_parent"
    tools:context=".MainActivity" >


    <RelativeLayout
        android:id="@+id/girl1"
        android:layout_width="match_parent"
        android:layout_height="400dp"
        android:background="@drawable/girl1"
        ></RelativeLayout>

    <RelativeLayout
        android:layout_below="@id/girl1"
        android:layout_width="match_parent"
        android:layout_height="400dp"
        android:background="@drawable/girl2"
        ></RelativeLayout>

</RelativeLayout>

常用布局之相对布局
RelativeLayout中子控件常用属性:
-
1、相对于父控件,例如:android:layout_alignParentTop=“true”
android:layout_alignParentTop 控件的顶部与父控件的顶部对齐;
android:layout_alignParentBottom 控件的底部与父控件的底部对齐;
android:layout_alignParentLeft 控件的左部与父控件的左部对齐;
android:layout_alignParentRight 控件的右部与父控件的右部对齐; -
2、相对给定Id控件,例如:android:layout_above=“@id/**”
android:layout_above 控件的底部置于给定ID的控件之上;
android:layout_below 控件的底部置于给定ID的控件之下;
android:layout_toLeftOf 控件的右边缘与给定ID的控件左边缘对齐;
android:layout_toRightOf 控件的左边缘与给定ID的控件右边缘对齐;
android:layout_alignBaseline 控件的baseline与给定ID的baseline对齐;
android:layout_alignTop 控件的顶部边缘与给定ID的顶部边缘对齐;
android:layout_alignBottom 控件的底部边缘与给定ID的底部边缘对齐;
android:layout_alignLeft 控件的左边缘与给定ID的左边缘对齐;
android:layout_alignRight 控件的右边缘与给定ID的右边缘对齐; -
3、居中,例如:android:layout_centerInParent=“true”
android:layout_centerHorizontal 水平居中;
android:layout_centerVertical 垂直居中;
android:layout_centerInParent 父控件的中央;
activity_main.xml
<RelativeLayout xmlns:android="http://schemas.android.com/apk/res/android"
    xmlns:tools="http://schemas.android.com/tools"
	android:layout_width="match_parent"
	android:layout_height="match_parent"
    tools:context=".MainActivity" >


      <RelativeLayout
        android:id="@+id/girl2"
        android:layout_width="wrap_content"
        android:layout_height="wrap_content"
        android:background="@drawable/testpic32"
        android:layout_centerInParent="true"
        ></RelativeLayout>


</RelativeLayout>
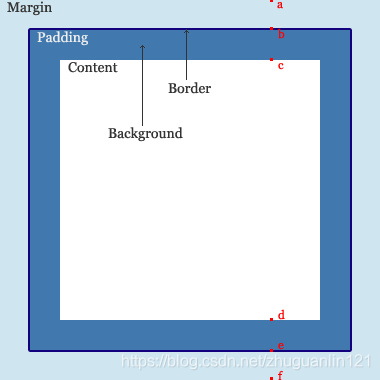
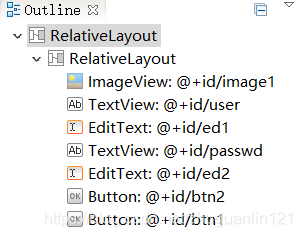
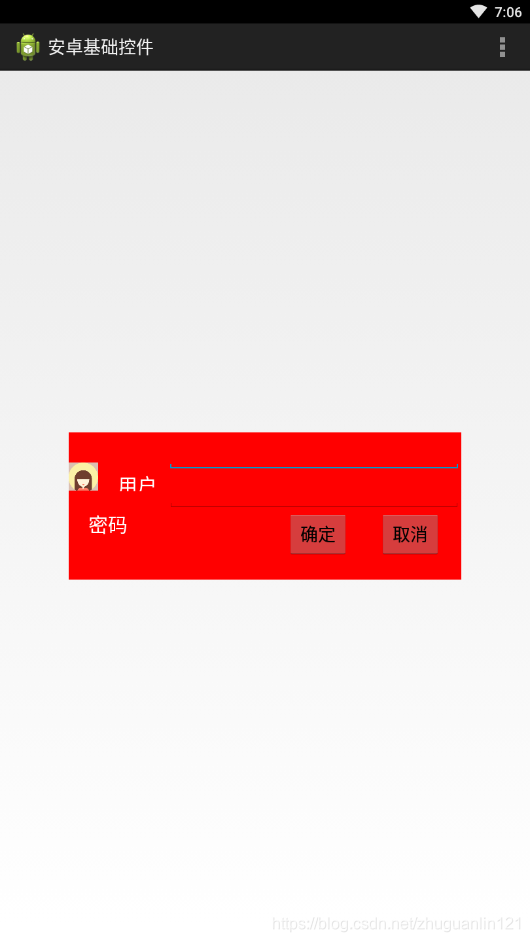
基础控件之Button,TextView,EditText,ImageView, padding和margin(内外边框)
由于拖拽的方式产生的控件容易跑飞,这里我们采用代码的方式去生成控件。
内外边框参照博文:https://www.cnblogs.com/dongh/p/9584962.html
<RelativeLayout xmlns:android="http://schemas.android.com/apk/res/android"
    xmlns:tools="http://schemas.android.com/tools"
    android:layout_width="match_parent"
    android:layout_height="match_parent"
    android:paddingBottom="@dimen/activity_vertical_margin"
    android:paddingLeft="@dimen/activity_horizontal_margin"
    android:paddingRight="@dimen/activity_horizontal_margin"
    android:paddingTop="@dimen/activity_vertical_margin"
    tools:context=".MainActivity" >


    <RelativeLayout
        android:layout_width="400dp"
        android:layout_height="150dp"
        android:layout_centerInParent="true"
        android:background="#ff0000"
        >

       <ImageView
       	android:id="@+id/image1"
        android:layout_width="30dp"
        android:layout_height="30dp"
        android:background="#ff0000"
        android:src="@drawable/user"
        android:layout_marginTop="30dp"
        />

        <TextView
            android:layout_toRightOf="@id/image1"
            android:layout_alignBottom="@id/image1"
            android:layout_alignTop="@id/image1"
            android:layout_marginTop="10dp"
            android:id="@+id/user"
            android:layout_width="wrap_content"
            android:layout_height="wrap_content"
            android:text="用户"
            android:layout_marginLeft="20dp"
            android:layout_marginRight="10dp"
            android:textSize="20dp"
            android:textColor="#ffffff"
            />

        <EditText
            android:id="@+id/ed1"
            android:layout_width="320dp"
            android:layout_height="40dp"
            android:layout_toRightOf="@id/user"
            />

        <TextView
            android:id="@+id/passwd"
            android:layout_width="wrap_content"
            android:layout_height="wrap_content"
            android:text="密码"
            android:layout_marginLeft="20dp"
            android:layout_marginRight="10dp"
            android:layout_marginTop="20dp"

            android:textSize="20dp"
            android:layout_below="@id/user"
            android:textColor="#ffffff"
            />

         <EditText
            android:id="@+id/ed2"
            android:layout_width="320dp"
            android:layout_height="40dp"
            android:layout_toRightOf="@id/user"
            android:layout_below="@id/ed1"
            />


           <Button
             android:layout_width="wrap_content"
             android:layout_height="wrap_content"
             android:layout_alignParentRight="true"
             android:layout_marginRight="20dp"
             android:text="取消"
             android:id="@+id/btn2"
             android:layout_below="@id/ed2"

             />

           <Button
             android:layout_width="wrap_content"
             android:layout_height="wrap_content"
             android:layout_marginRight="30dp"
             android:text="确定"
             android:id="@+id/btn1"
             android:layout_below="@id/ed2"
             android:layout_toLeftOf="@id/btn2"

             />

    </RelativeLayout>


</RelativeLayout>
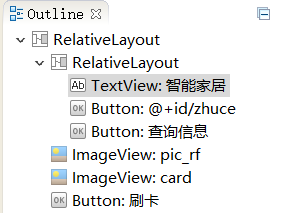
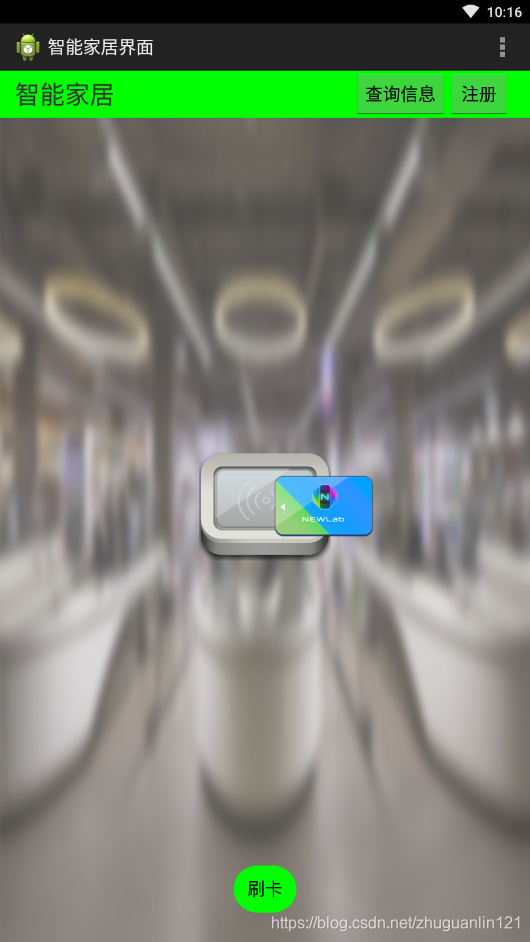
相对布局综合小演练-智能家居刷卡界面
<RelativeLayout xmlns:android="http://schemas.android.com/apk/res/android"
xmlns:tools="http://schemas.android.com/tools"
android:layout_width="match_parent"
android:layout_height="match_parent"
android:background="@drawable/bg_shopping_menu"
tools:context=".MainActivity" >
<RelativeLayout
android:layout_width="match_parent"
android:layout_height="wrap_content"
android:background="#00ff00"
>
<TextView
android:layout_width="wrap_content"
android:layout_height="wrap_content"
android:text="智能家居"
android:textSize="25dp"
android:layout_marginLeft="15dp"
android:layout_marginTop="6dp"
/>
<Button
android:id="@+id/zhuce"
android:layout_width="wrap_content"
android:layout_height="wrap_content"
android:text="注册"
android:layout_alignParentRight="true"
android:layout_marginRight="20dp"
/>
<Button
android:layout_width="wrap_content"
android:layout_height="wrap_content"
android:text="查询信息"
android:layout_toLeftOf="@id/zhuce"
/>
</RelativeLayout>
<ImageView
android:layout_width="wrap_content"
android:layout_height="wrap_content"
android:src="@drawable/pic_rf"
android:layout_centerInParent="true"
/>
<ImageView
android:layout_width="wrap_content"
android:layout_height="wrap_content"
android:src="@drawable/card"
android:layout_centerInParent="true"
android:paddingLeft="120dp"
/>
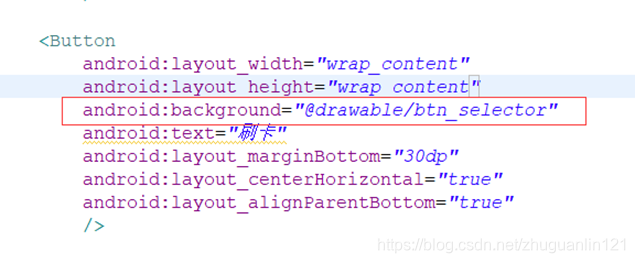
<Button
android:layout_width="wrap_content"
android:layout_height="wrap_content"
android:background="@drawable/btn_selector"
android:text="刷卡"
android:layout_marginBottom="30dp"
android:layout_centerHorizontal="true"
android:layout_alignParentBottom="true"
/>
</RelativeLayout>
运行效果:
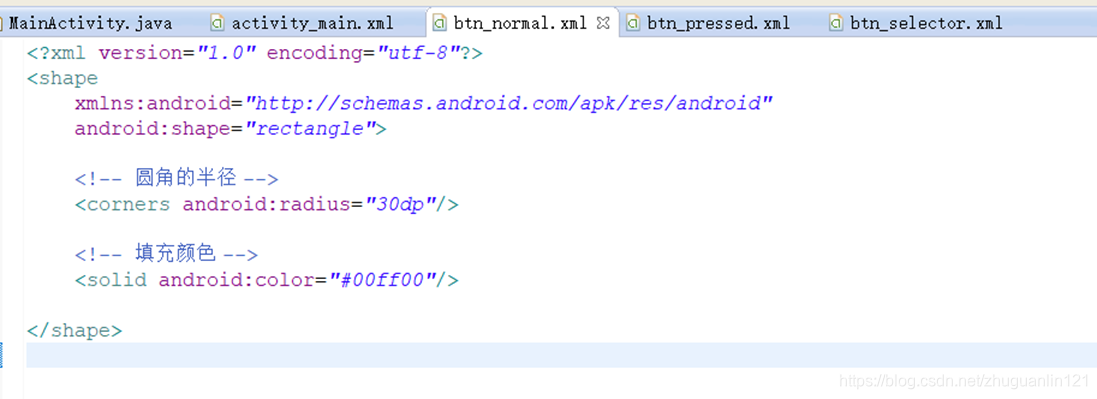
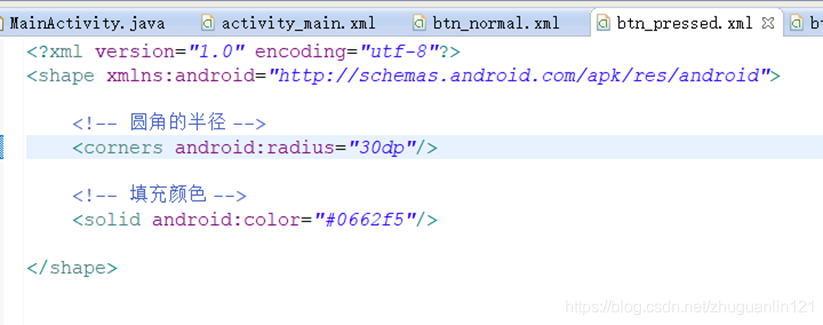
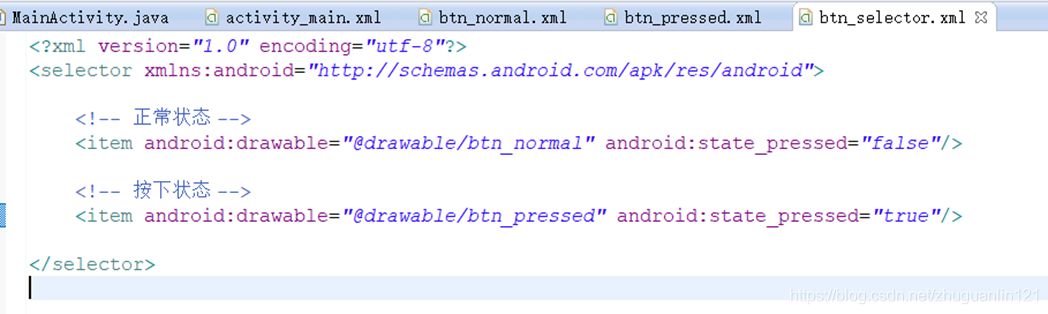
按键美化
方法:在drawable底下新建.xml文件(代码如下面博文中介绍),然后在主xml里面去引用这些美化的xml。
https://blog.csdn.net/tracydragonlxy/article/details/88552262
常用布局之线性布局
介绍
之前介绍的相对布局,自由拖拽控件时,摆放的位置是任意的,而线性布局在拖拽时,控件是不能任意放置的。只能在横线(默认)、竖线方向排列控件。

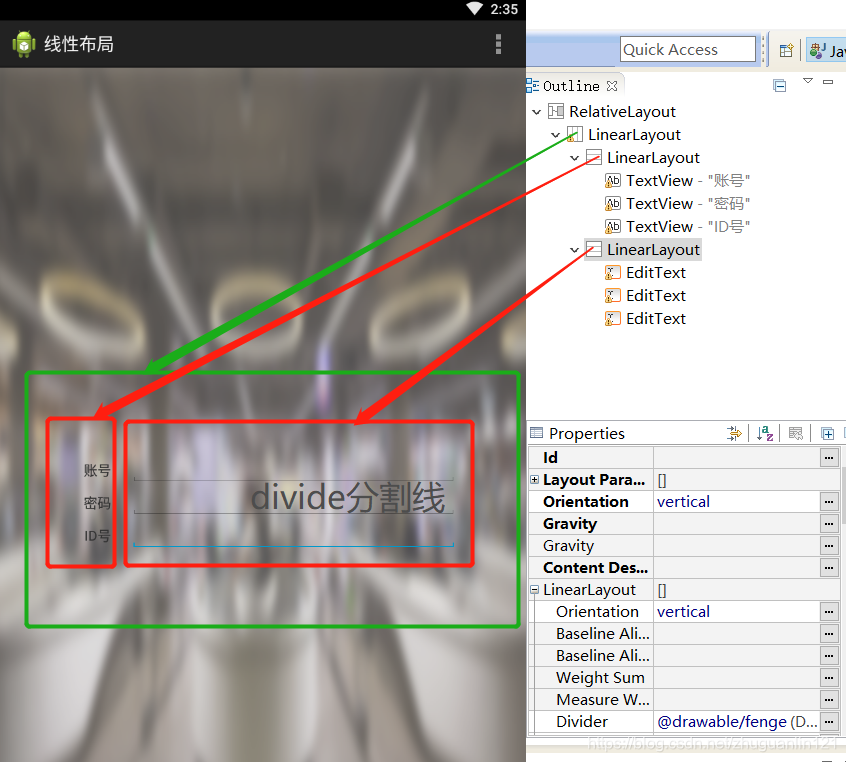
线性布局orientation、weight、gravity、divider属性
activity_main.xml
<RelativeLayout xmlns:android="http://schemas.android.com/apk/res/android"
    xmlns:tools="http://schemas.android.com/tools"
    android:layout_width="match_parent"
    android:layout_height="match_parent"
    android:background="@drawable/bg_shopping_menu"
    tools:context=".MainActivity" >

    <LinearLayout
        android:layout_width="400dp"
        android:layout_height="100dp"
        android:layout_centerInParent="true"
        android:orientation="horizontal" >

        <LinearLayout
            android:layout_width="0dp"
            android:layout_height="100dp"
            android:layout_weight="1"
            android:divider="@drawable/fenge"
            android:dividerPadding="2dp"
            android:orientation="vertical"
            android:showDividers="middle|end" >

            <TextView
                android:layout_width="match_parent"
                android:layout_height="0dp"
                android:layout_weight="1"
                android:gravity="center"
                android:text="账号" />

            <TextView
                android:layout_width="match_parent"
                android:layout_height="0dp"
                android:layout_weight="1"
                android:gravity="center"
                android:text="密码" />

            <TextView
                android:layout_width="match_parent"
                android:layout_height="0dp"
                android:layout_weight="1"
                android:gravity="center"
                android:text="ID号" />
        </LinearLayout>

        <LinearLayout
            android:layout_width="0dp"
            android:layout_height="100dp"
            android:layout_weight="5"
            android:divider="@drawable/fenge"
            android:dividerPadding="2dp"
            android:orientation="vertical"
            android:showDividers="middle|end" >

            <EditText
                android:layout_width="match_parent"
                android:layout_height="0dp"
                android:layout_weight="1" />

            <EditText
                android:layout_width="match_parent"
                android:layout_height="0dp"
                android:layout_weight="1" />

            <EditText
                android:layout_width="match_parent"
                android:layout_height="0dp"
                android:layout_weight="1" />
        </LinearLayout>
    </LinearLayout>

</RelativeLayout>
fenge.xml
<?xml version="1.0" encoding="utf-8"?>
<shape xmlns:android="http://schemas.android.com/apk/res/android"
    android:shape="line"
    >

    <size
        android:width="200dp"
        android:height="2dp"
        />

    <stroke android:color="#000000"/>

</shape>
安卓按键响应的几种方式
在xml中设置按键的onClick绑定的函数
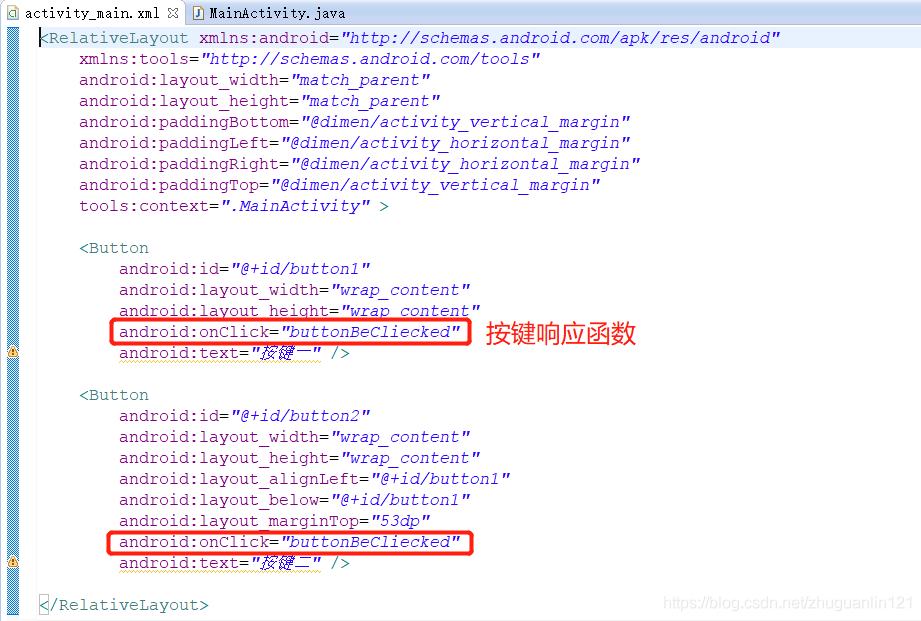
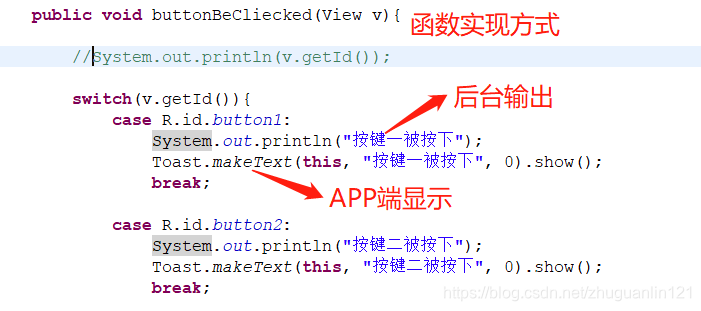
activity_main.xml
<RelativeLayout xmlns:android="http://schemas.android.com/apk/res/android"
    xmlns:tools="http://schemas.android.com/tools"
    android:layout_width="match_parent"
    android:layout_height="match_parent"
    android:paddingBottom="@dimen/activity_vertical_margin"
    android:paddingLeft="@dimen/activity_horizontal_margin"
    android:paddingRight="@dimen/activity_horizontal_margin"
    android:paddingTop="@dimen/activity_vertical_margin"
    tools:context=".MainActivity" >

    <Button
        android:id="@+id/button1"
        android:layout_width="wrap_content"
        android:layout_height="wrap_content"
        android:onClick="buttonBeCliecked"
        android:text="按键一" />

    <Button
        android:id="@+id/button2"
        android:layout_width="wrap_content"
        android:layout_height="wrap_content"
        android:layout_alignLeft="@+id/button1"
        android:layout_below="@+id/button1"
        android:layout_marginTop="53dp"
        android:onClick="buttonBeCliecked"
        android:text="按键二" />

</RelativeLayout>
MainActivity.java
package com.example.sgkbc.button;

import android.app.Activity;
import android.os.Bundle;
import android.view.View;
import android.widget.Toast;

public class MainActivity extends Activity {

    @Override
    protected void onCreate(Bundle savedInstanceState) {
        super.onCreate(savedInstanceState);
        setContentView(R.layout.activity_main);
    }

    public void buttonBeCliecked(View v){

    	//System.out.println(v.getId());

    	switch(v.getId()){
	    	case R.id.button1:
	    		System.out.println("按键一被按下");
	    		Toast.makeText(this, "按键一被按下", 0).show();
	    		break;

	    	case R.id.button2:
	    		System.out.println("按键二被按下");
	    		Toast.makeText(this, "按键二被按下", 0).show();
	    		break;

    	}

    }


}
自定义类实现按键监听事件的接口
参照博文: 安卓开发中的监听器(OnClickListener)
步骤一:绑定局部变量button和xml中的button, 使用API函数:findViewById

步骤二:实现接口类,在类中实现onclicked方法,写业务代码
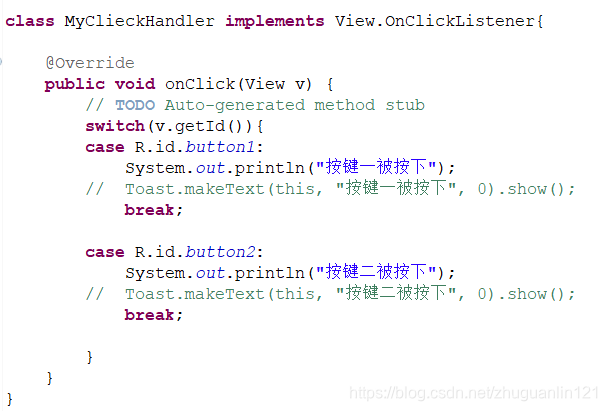
步骤三:为1,2两步做的准备进行绑定,使得按键被按下后执行你写的业务代码

activity_main.xml
<RelativeLayout xmlns:android="http://schemas.android.com/apk/res/android"
    xmlns:tools="http://schemas.android.com/tools"
    android:layout_width="match_parent"
    android:layout_height="match_parent"
    android:paddingBottom="@dimen/activity_vertical_margin"
    android:paddingLeft="@dimen/activity_horizontal_margin"
    android:paddingRight="@dimen/activity_horizontal_margin"
    android:paddingTop="@dimen/activity_vertical_margin"
    tools:context=".MainActivity" >

    <Button
        android:id="@+id/button1"
        android:layout_width="wrap_content"
        android:layout_height="wrap_content"

        android:text="按键一" />

    <Button
        android:id="@+id/button2"
        android:layout_width="wrap_content"
        android:layout_height="wrap_content"
        android:layout_alignLeft="@+id/button1"
        android:layout_below="@+id/button1"
        android:layout_marginTop="58dp"
        android:text="按键二" />

</RelativeLayout>
MainActivity.java
package com.example.sgkbc.button;

import android.app.Activity;
import android.os.Bundle;
import android.view.View;
import android.widget.Button;
import android.widget.Toast;


//实现接口类,在类中实现onclicked方法,写业务代码
class MyClieckHandler implements View.OnClickListener{

	@Override
	public void onClick(View v) {
		// TODO Auto-generated method stub
		switch(v.getId()){
    	case R.id.button1:
    		System.out.println("按键一被按下");
    	//	Toast.makeText(this, "按键一被按下", 0).show();
    		break;

    	case R.id.button2:
    		System.out.println("按键二被按下");
    	//	Toast.makeText(this, "按键二被按下", 0).show();
    		break;

		}
	}
}

public class MainActivity extends Activity {

	Button btn1;
	Button btn2;

    @Override
    protected void onCreate(Bundle savedInstanceState) {
        super.onCreate(savedInstanceState);
        setContentView(R.layout.activity_main);

        //绑定 局部变量button和xml中的button,  findViewById
        btn1 = (Button) findViewById(R.id.button1);
        btn2 = (Button) findViewById(R.id.button2);

        //绑定 按键被按下后执行你写的业务代码
        btn1.setOnClickListener(new MyClieckHandler());
        btn2.setOnClickListener(new MyClieckHandler());
    }

}
匿名内部类实现按键响应
JAVA知识,匿名内部类由于没有名字,导致每次用它的时候都要建这个类,并实现里面的接口。
MainActivity.java
package com.example.sgkbc.button;

import android.app.Activity;
import android.os.Bundle;
import android.view.View;
import android.widget.Button;
import android.widget.Toast;

public class MainActivity extends Activity {

	Button btn1;
	Button btn2;

    @Override
    protected void onCreate(Bundle savedInstanceState) {
        super.onCreate(savedInstanceState);
        setContentView(R.layout.activity_main);

        btn1 = (Button) findViewById(R.id.button1);
        btn2 = (Button) findViewById(R.id.button2);

        btn1.setOnClickListener(new View.OnClickListener() {

			@Override
			public void onClick(View arg0) {
				// TODO Auto-generated method stub
				System.out.println("按键一被按下");
		    	Toast.makeText(MainActivity.this, "按键一被按下", 0).show();
			}
		});

        btn2.setOnClickListener(new View.OnClickListener() {

			@Override
			public void onClick(View arg0) {
				// TODO Auto-generated method stub
				System.out.println("按键二被按下");
		    	Toast.makeText(MainActivity.this, "按键二被按下", 0).show();
			}
		});
    }

}
activity_main.xml
<RelativeLayout xmlns:android="http://schemas.android.com/apk/res/android"
    xmlns:tools="http://schemas.android.com/tools"
    android:layout_width="match_parent"
    android:layout_height="match_parent"
    android:paddingBottom="@dimen/activity_vertical_margin"
    android:paddingLeft="@dimen/activity_horizontal_margin"
    android:paddingRight="@dimen/activity_horizontal_margin"
    android:paddingTop="@dimen/activity_vertical_margin"
    tools:context=".MainActivity" >

    <Button
        android:id="@+id/button1"
        android:layout_width="wrap_content"
        android:layout_height="wrap_content"

        android:text="按键一" />

    <Button
        android:id="@+id/button2"
        android:layout_width="wrap_content"
        android:layout_height="wrap_content"
        android:layout_alignLeft="@+id/button1"
        android:layout_below="@+id/button1"
        android:layout_marginTop="57dp"
        android:text="按键二" />

</RelativeLayout>
Activity实现click接口
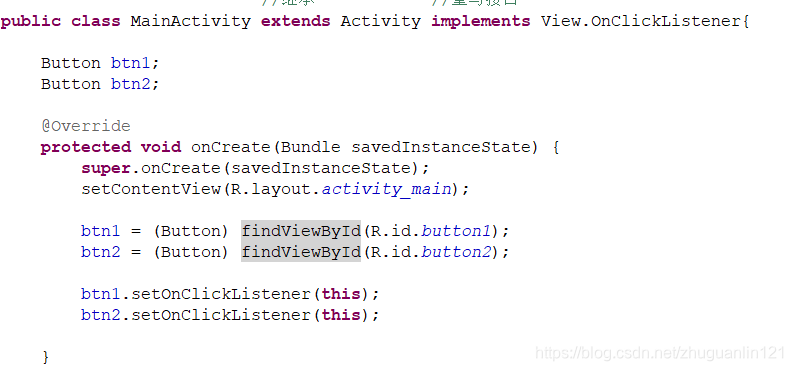
activity_main.xml
<RelativeLayout xmlns:android="http://schemas.android.com/apk/res/android"
    xmlns:tools="http://schemas.android.com/tools"
    android:layout_width="match_parent"
    android:layout_height="match_parent"
    android:paddingBottom="@dimen/activity_vertical_margin"
    android:paddingLeft="@dimen/activity_horizontal_margin"
    android:paddingRight="@dimen/activity_horizontal_margin"
    android:paddingTop="@dimen/activity_vertical_margin"
    tools:context=".MainActivity" >

    <Button
        android:id="@+id/button1"
        android:layout_width="wrap_content"
        android:layout_height="wrap_content"

        android:text="按键一" />

    <Button
        android:id="@+id/button2"
        android:layout_width="wrap_content"
        android:layout_height="wrap_content"
        android:layout_alignLeft="@+id/button1"
        android:layout_below="@+id/button1"
        android:layout_marginTop="58dp"
        android:text="按键二" />

</RelativeLayout>
MainActivity.java
package com.example.sgkbc.button;

import android.app.Activity;
import android.os.Bundle;
import android.view.View;
import android.widget.Button;
import android.widget.Toast;
					      //继承			   //重写接口
public class MainActivity extends Activity implements View.OnClickListener{

	Button btn1;
	Button btn2;

    @Override
    protected void onCreate(Bundle savedInstanceState) {
        super.onCreate(savedInstanceState);
        setContentView(R.layout.activity_main);

        btn1 = (Button) findViewById(R.id.button1);
        btn2 = (Button) findViewById(R.id.button2);

        btn1.setOnClickListener(this);
        btn2.setOnClickListener(this);

    }

	@Override
	public void onClick(View v) {
		// TODO Auto-generated method stub
		switch(v.getId()){
    	case R.id.button1:
    		System.out.println("按键一被按下");
    	//	Toast.makeText(this, "按键一被按下", 0).show();
    		break;

    	case R.id.button2:
    		System.out.println("按键二被按下");
    	//	Toast.makeText(this, "按键二被按下", 0).show();
    		break;

		}
	}

}
安卓页面跳转
为安卓添加多个页面
在src下new一个.Activity文件,就新建了一个页面,继续new则继续添加页面。添加成功后会产生相对的JAVA以及xml文件,另外图中介绍了将相应页面设置成安卓启动界面的方法。
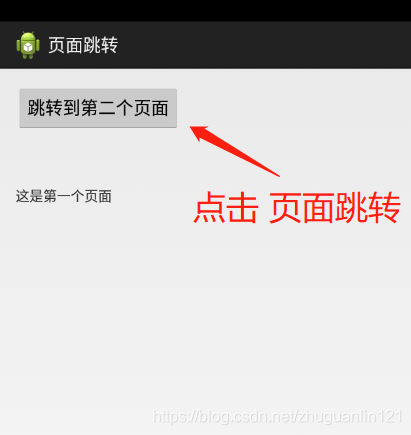
页面跳转方法
跳转的API使用方法:

介绍三个界面的跳转方法例子(一跳到二,二跳到三):
MainActivity.java
package com.example.sgkbc.activity;//注意快捷键自动导包的方法

import android.app.Activity;
import android.content.Intent;
import android.os.Bundle;
import android.view.View;

public class MainActivity extends Activity {

    @Override
    protected void onCreate(Bundle savedInstanceState) {
        super.onCreate(savedInstanceState);
        setContentView(R.layout.activity_main);


    }

    public void goSecond(View v){
    	 //intent去设置要跳转的页面
        Intent intent = new Intent(this, SecondActivity.class);
        //跳转
        startActivity(intent);

    }
}
activity_main.xml
<RelativeLayout xmlns:android="http://schemas.android.com/apk/res/android"
    xmlns:tools="http://schemas.android.com/tools"
    android:layout_width="match_parent"
    android:layout_height="match_parent"
    android:paddingBottom="@dimen/activity_vertical_margin"
    android:paddingLeft="@dimen/activity_horizontal_margin"
    android:paddingRight="@dimen/activity_horizontal_margin"
    android:paddingTop="@dimen/activity_vertical_margin"
    tools:context=".MainActivity" >

    <Button
        android:id="@+id/button1"
        android:layout_width="wrap_content"
        android:layout_height="wrap_content"
        android:onClick="goSecond"
        android:text="跳转到第二个页面" />

    <TextView
        android:id="@+id/textView1"
        android:layout_width="wrap_content"
        android:layout_height="wrap_content"
        android:layout_alignLeft="@+id/button1"
        android:layout_below="@+id/button1"
        android:layout_marginTop="55dp"
        android:text="这是第一个页面" />

</RelativeLayout>
SecondActivity.java
package com.example.sgkbc.activity;

import android.os.Bundle;
import android.app.Activity;
import android.content.Intent;
import android.view.Menu;
import android.view.View;

public class SecondActivity extends Activity {

	@Override
	protected void onCreate(Bundle savedInstanceState) {
		super.onCreate(savedInstanceState);
		setContentView(R.layout.activity_second);
	}


    public void goThird(View v){
    	 //intent去设置要跳转的页面
        Intent intent = new Intent(this, ThirdActivity.class);
        //跳转
        startActivity(intent);

    }

}
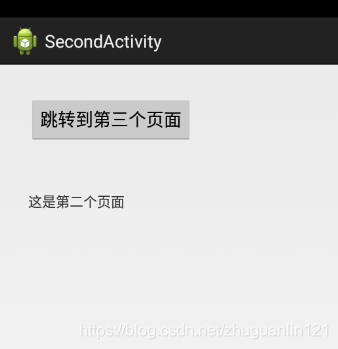
activity_second.xml
<RelativeLayout xmlns:android="http://schemas.android.com/apk/res/android"
    xmlns:tools="http://schemas.android.com/tools"
    android:layout_width="match_parent"
    android:layout_height="match_parent"
    android:paddingBottom="@dimen/activity_vertical_margin"
    android:paddingLeft="@dimen/activity_horizontal_margin"
    android:paddingRight="@dimen/activity_horizontal_margin"
    android:paddingTop="@dimen/activity_vertical_margin"
    tools:context=".SecondActivity" >

    <TextView
        android:id="@+id/textView1"
        android:layout_width="wrap_content"
        android:layout_height="wrap_content"
        android:layout_alignParentLeft="true"
        android:layout_alignParentTop="true"
        android:layout_marginLeft="16dp"
        android:layout_marginTop="113dp"
        android:text="这是第二个页面" />

    <Button
        android:id="@+id/button1"
        android:layout_width="wrap_content"
        android:layout_height="wrap_content"
        android:layout_alignLeft="@+id/textView1"
        android:layout_alignParentTop="true"
        android:layout_marginTop="16dp"
        android:onClick="goThird"
        android:text="跳转到第三个页面" />

</RelativeLayout>
ThirdActivity.java
package com.example.sgkbc.activity;

import android.os.Bundle;
import android.app.Activity;
import android.view.Menu;

public class ThirdActivity extends Activity {

	@Override
	protected void onCreate(Bundle savedInstanceState) {
		super.onCreate(savedInstanceState);
		setContentView(R.layout.activity_third);
	}

	@Override
	public boolean onCreateOptionsMenu(Menu menu) {
		// Inflate the menu; this adds items to the action bar if it is present.
		getMenuInflater().inflate(R.menu.third, menu);
		return true;
	}

}
activity_third.xml
<RelativeLayout xmlns:android="http://schemas.android.com/apk/res/android"
    xmlns:tools="http://schemas.android.com/tools"
    android:layout_width="match_parent"
    android:layout_height="match_parent"
    android:paddingBottom="@dimen/activity_vertical_margin"
    android:paddingLeft="@dimen/activity_horizontal_margin"
    android:paddingRight="@dimen/activity_horizontal_margin"
    android:paddingTop="@dimen/activity_vertical_margin"
    tools:context=".ThirdActivity" >

    <TextView
        android:layout_width="wrap_content"
        android:layout_height="wrap_content"
        android:text="这是第三个页面" />

</RelativeLayout>
页面跳转传参
方法一:使用intent
传递:
接收:

MainActivity.java
package com.example.sgkbc.activity;
import android.app.Activity;
import android.content.Intent;
import android.os.Bundle;
import android.view.View;
public class MainActivity extends Activity {
@Override
protected void onCreate(Bundle savedInstanceState) {
super.onCreate(savedInstanceState);
setContentView(R.layout.activity_main);
}
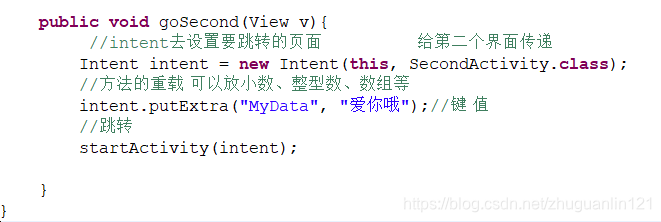
public void goSecond(View v){
//intent去设置要跳转的页面 给第二个界面传递
Intent intent = new Intent(this, SecondActivity.class);
//方法的重载 可以放小数、整型数、数组等
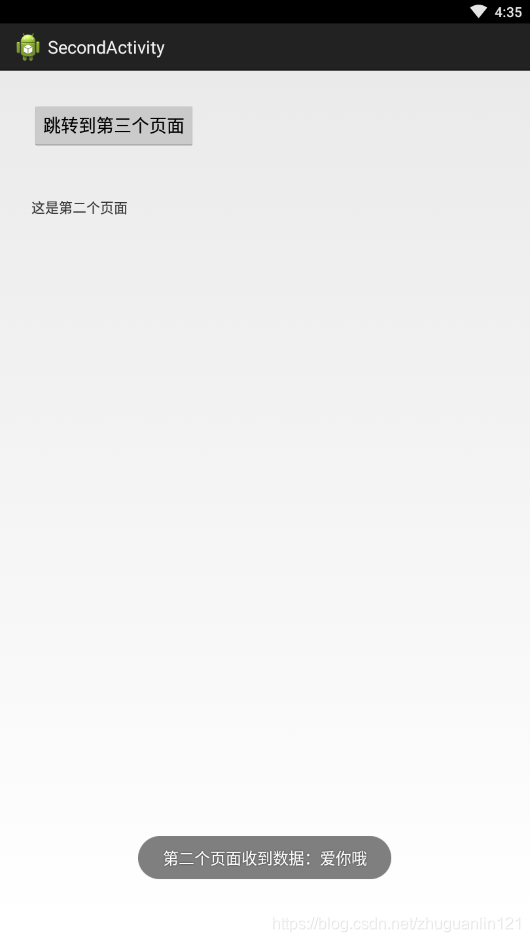
intent.putExtra("MyData", "爱你哦");//键 值
//跳转
startActivity(intent);
}
}
SecondActivity.java
package com.example.sgkbc.activity;

import android.os.Bundle;
import android.app.Activity;
import android.content.Intent;
import android.view.Menu;
import android.view.View;
import android.widget.Toast;

public class SecondActivity extends Activity {

	private String data;
	@Override
	protected void onCreate(Bundle savedInstanceState) {
		super.onCreate(savedInstanceState);
		setContentView(R.layout.activity_second);

		//接收来自第一个界面
		Intent i = this.getIntent();//不能new一个 要在这个底下获取到这个Intent
		data = i.getStringExtra("MyData");// 键值
		//System.out.println("收到数据:"+data);
		Toast.makeText(this, "第二个页面收到数据:"+data, 0).show();
	}


    public void goThird(View v){
    	 //intent去设置要跳转的页面                  继续给第三个界面传
        Intent intent = new Intent(this, ThirdActivity.class);
        intent.putExtra("MyData", data);
        //跳转
        startActivity(intent);

    }

}
方法二:使用bundle
发送:

接收:

MainActivity.java
package com.example.sgkbc.activity;
import android.app.Activity;
import android.content.Intent;
import android.os.Bundle;
import android.view.View;
public class MainActivity extends Activity {
@Override
protected void onCreate(Bundle savedInstanceState) {
super.onCreate(savedInstanceState);
setContentView(R.layout.activity_main);
}
public void goSecond(View v){
//intent去设置要跳转的页面
Intent intent = new Intent(this, SecondActivity.class);
Bundle bundle = new Bundle();
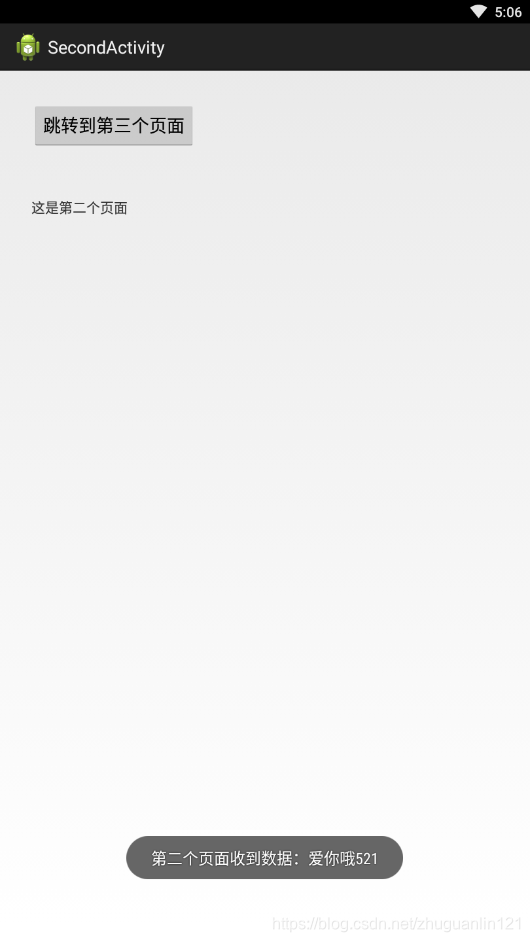
bundle.putString("MyData", "爱你哦");
bundle.putInt("ID", 521);
intent.putExtras(bundle);
// intent.putExtra("MyData", "爱你哦");
//跳转
startActivity(intent);
}
}
SecondActivity.java
package com.example.sgkbc.activity;

import android.os.Bundle;
import android.app.Activity;
import android.content.Intent;
import android.view.Menu;
import android.view.View;
import android.widget.Toast;

public class SecondActivity extends Activity {

	//private String data;
	@Override
	protected void onCreate(Bundle savedInstanceState) {
		super.onCreate(savedInstanceState);
		setContentView(R.layout.activity_second);

		Intent i = this.getIntent();
		//data = i.getStringExtra("MyData");//MyData
		//System.out.println("收到数据:"+data);
		Bundle b = i.getExtras();
		String data = b.getString("MyData");
		int data2 = b.getInt("ID");
		Toast.makeText(this, "第二个页面收到数据:"+data+data2, 0).show();
	}


    public void goThird(View v){
    	 //intent去设置要跳转的页面
        Intent intent = new Intent(this, ThirdActivity.class);
       // intent.putExtra("MyData", data);
        //跳转
        startActivity(intent);

    }

}
安卓线程实现页面若干秒后自动跳转
实现页面的若干秒后的自动跳转效果
package com.example.sgkbc.activity;
import java.util.Scanner;
import android.app.Activity;
import android.content.Intent;
import android.os.Bundle;
import android.view.View;
public class MainActivity extends Activity {
@Override
protected void onCreate(Bundle savedInstanceState) {
super.onCreate(savedInstanceState);
setContentView(R.layout.activity_main);
// 新线程里面去sleep.要另外启动一个线程,在3秒后启动一个新页面。
//不要直接在UI线程中sleep(即直接Thread.sleep(3000)),
//因为安卓启动后开启ui线程(不断刷新界面) 直接被sleep会暂停刷新,第一个界面就看不到了,三秒后跳到第二个界面
// 如何在安卓(java)中创建线程
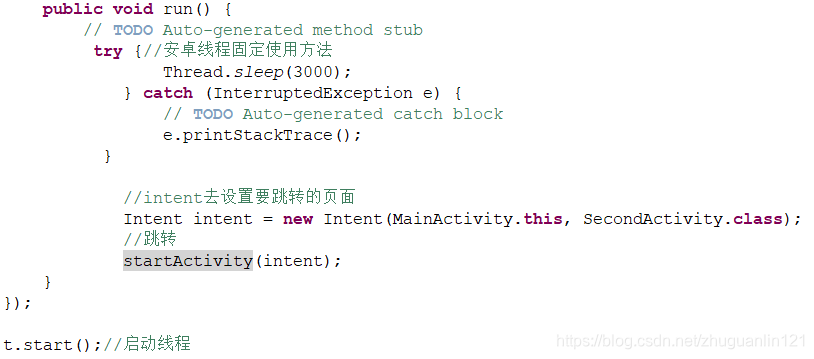
Thread t = new Thread(new Runnable() {//设置线程要干的活
@Override
public void run() {
// TODO Auto-generated method stub
try {//安卓线程固定使用方法
Thread.sleep(3000);
} catch (InterruptedException e) {
// TODO Auto-generated catch block
e.printStackTrace();
}
//intent去设置要跳转的页面
Intent intent = new Intent(MainActivity.this, SecondActivity.class);
//跳转
startActivity(intent);
}
});
t.start();//启动线程
}
public void goSecond(View v){
//intent去设置要跳转的页面
Intent intent = new Intent(this, SecondActivity.class);
//跳转
startActivity(intent);
}
}
运行安卓程序,发现三秒后自动跳转到第二个界面。
Activity(页面)的生命周期
参照博文——基础总结篇之一:Activity生命周期
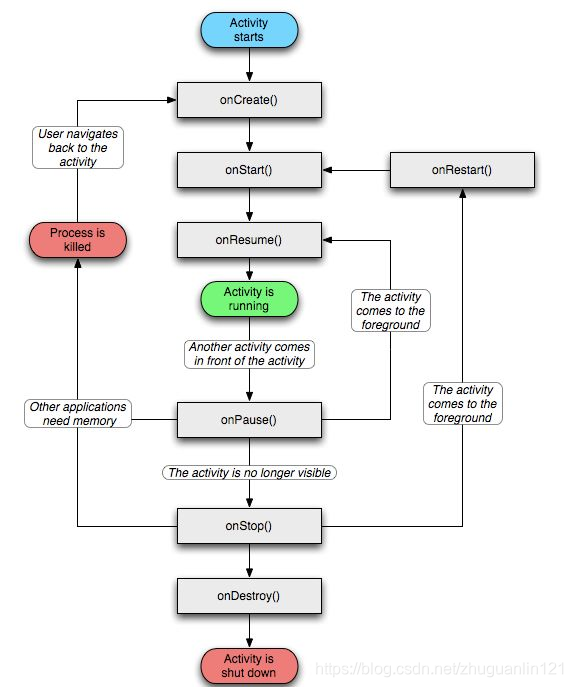
1.启动Activity:系统会先调用onCreate方法,然后调用onStart方法,最后调用onResume,Activity进入运行状态。
2.当前Activity被其他Activity覆盖其上或被锁屏:系统会调用onPause方法,暂停当前Activity的执行。
3.当前Activity由被覆盖状态回到前台或解锁屏:系统会调用onResume方法,再次进入运行状态。
4.当前Activity转到新的Activity界面或按Home键回到主屏,自身退居后台:系统会先调用onPause方法,然后调用onStop方法,进入停滞状态。
5.用户后退回到此Activity:系统会先调用onRestart方法,然后调用onStart方法,最后调用onResume方法,再次进入运行状态。
6.当前Activity处于被覆盖状态或者后台不可见状态,即第2步和第4步,系统内存不足,杀死当前Activity,而后用户退回当前Activity:再次调用onCreate方法、onStart方法、onResume方法,进入运行状态。
7.用户退出当前Activity:系统先调用onPause方法,然后调用onStop方法,最后调用onDestory方法,结束当前Activity。
详细验证过程参照自己的代码或者上面博文的示例。


 1339
1339


 暂无认证
暂无认证


 到【灌水乐园】发言


CSDN-Ada助手: 恭喜你这篇博客进入【CSDN每天值得看】榜单,全部的排名请看 https://bbs.csdn.net/topics/618777589。
2301_79681476: 请问完整的代码包在正点原子哪里可以下载呀?
周五: mpu6050当AD0=0时,从机地址为1101000。当AD0=1时,从机地址为1101001。文中好像有误
weixin_48879489: 问题解决了吗?我的LCKR锁定也是一样的问题,始终是0没变化
m0_68705692: 友友,可以给一下pdf版本嘛,万分感谢