使用开源微前端框架 Luigi 创建一个基于微前端架构的工程
 汪子熙
发表于 2022/07/11 13:55:41
2022/07/11
汪子熙
发表于 2022/07/11 13:55:41
2022/07/11
微前端通常被称为“前端微服务”。 它们允许您将大型单体前端分解为独立的、可扩展的、可以协同工作的独立部分。 微前端架构对于复杂的产品或拥有众多团队的公司尤其有用,可以帮助您创建一致的 Web 应用程序。
观看此 视频,其中解释了微前端架构的基础知识以及如何使用 Luigi 实现。
Luigi 是一个用 Svelte 编写的开源微前端框架。 它允许您创建一致的用户界面和导航,同时还提供其他功能以使开发更容易。 它的外观基于基本库样式。 Luigi 与技术无关,允许您使用 React、Angular、UI5 或任何其他技术构建应用程序并向其添加微前端。
Luigi Fiddle 是一个测试游乐场,您可以在其中感受 Luigi。
这张图描绘了 Luigi 的基本架构:
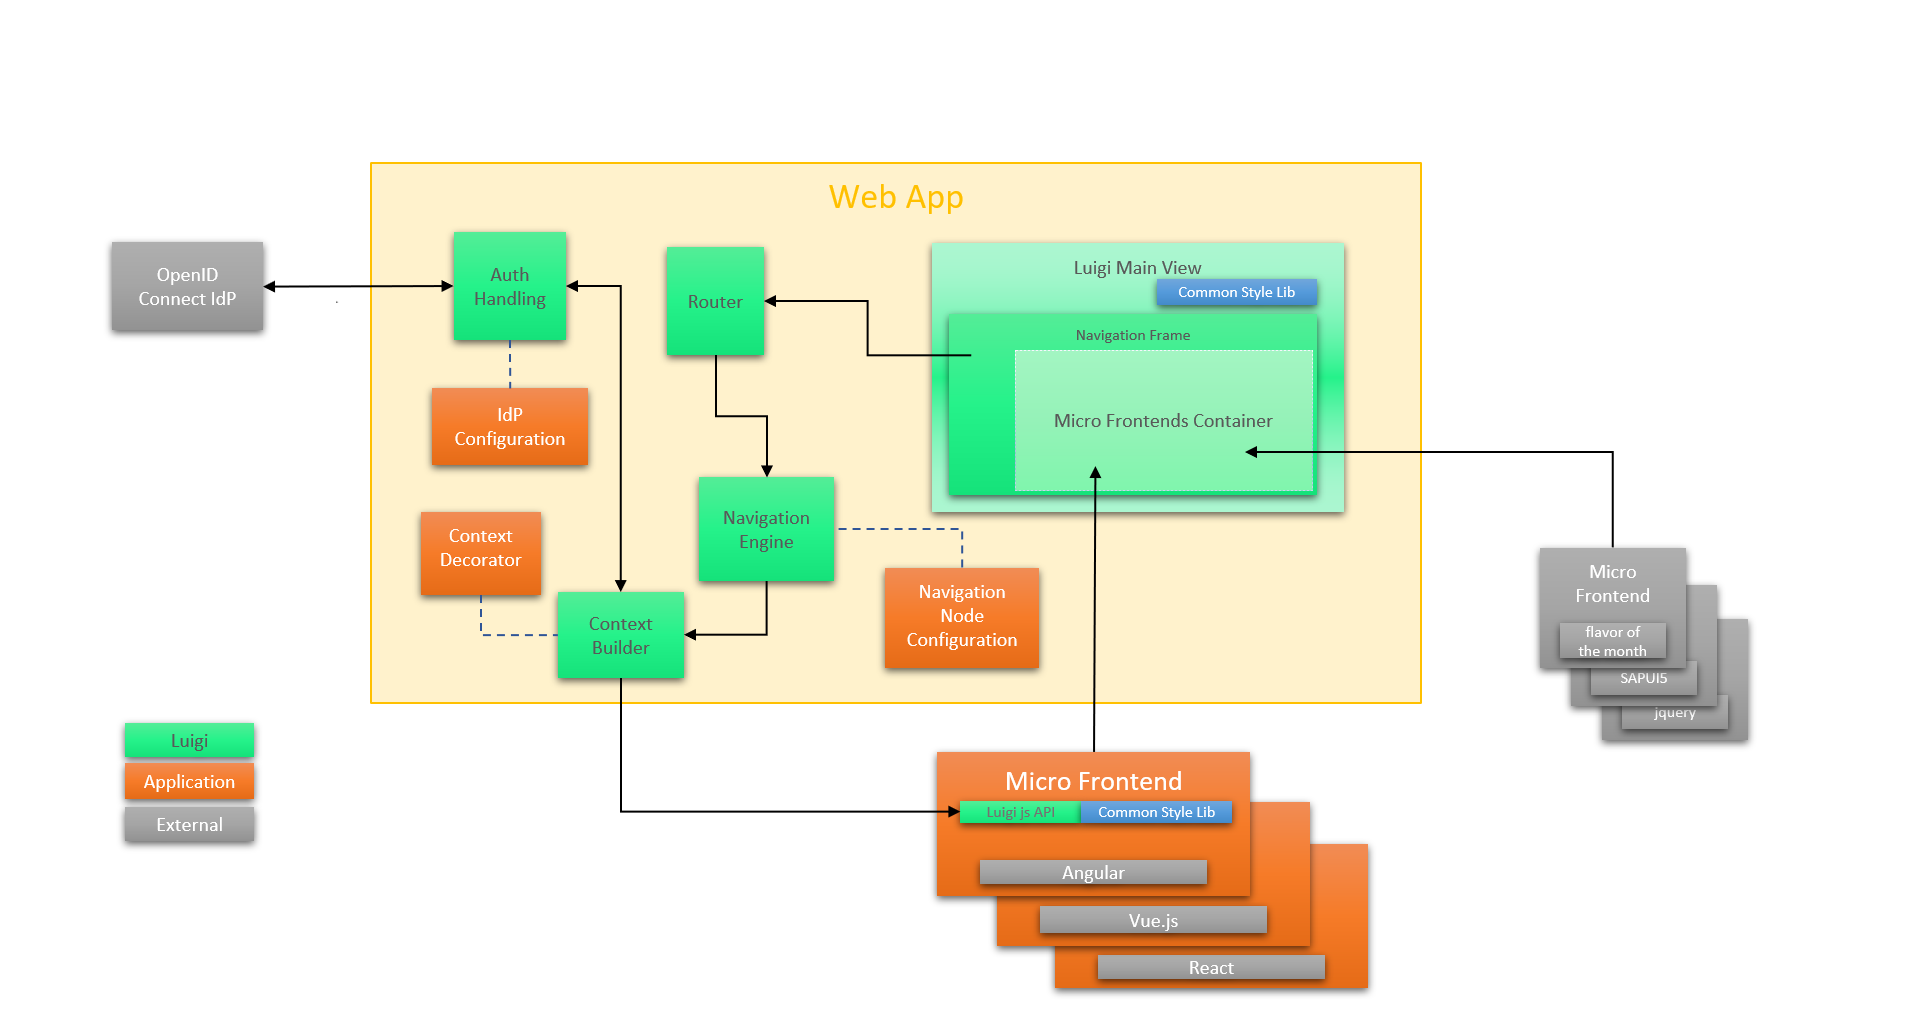
Luigi terminology
这是一小部分 Luigi 术语:
-
Luigi Core - 指其中显示微前端的主要应用程序。 它包括顶部和侧面导航以及与主应用程序相关的所有其他设置。
-
Luigi Client - 这个术语涵盖了 Luigi 提供的所有与微前端相关的设置。 微前端可通过 Luigi Client API 进行配置。
-
parameters - 参数是用于配置 Luigi 应用程序的元素。
-
导航节点 - Luigi 中侧面导航的各个链接。
-
Contexts - 上下文是 Luigi 参数,允许您将对象传递到微前端。
-
Views - 视图,微前端的另一个名称。
本系列文章,我们将从头开始使用 Luigi 创建一个应用程序。它将基于网络购物平台的理念,并将包括其他功能,例如用于以英语和德语显示网站的本地化。
该应用程序由三个主要部分组成:
-
使用 React 构建的 Luigi Core 应用程序:“主应用程序”,其中包含微前端并包括无论您导航到应用程序的哪个子页面都保持一致的顶部和侧面导航。
-
使用 React 构建的微前端:它们包括主页、“产品”页面和包含每个产品信息的“产品详细信息”列表。
-
使用 UI5 构建的微前端:“订单历史”页面,显示已购买产品的数量和价格。
最后,您完成的应用程序的主页应如下所示:

完整 源代码
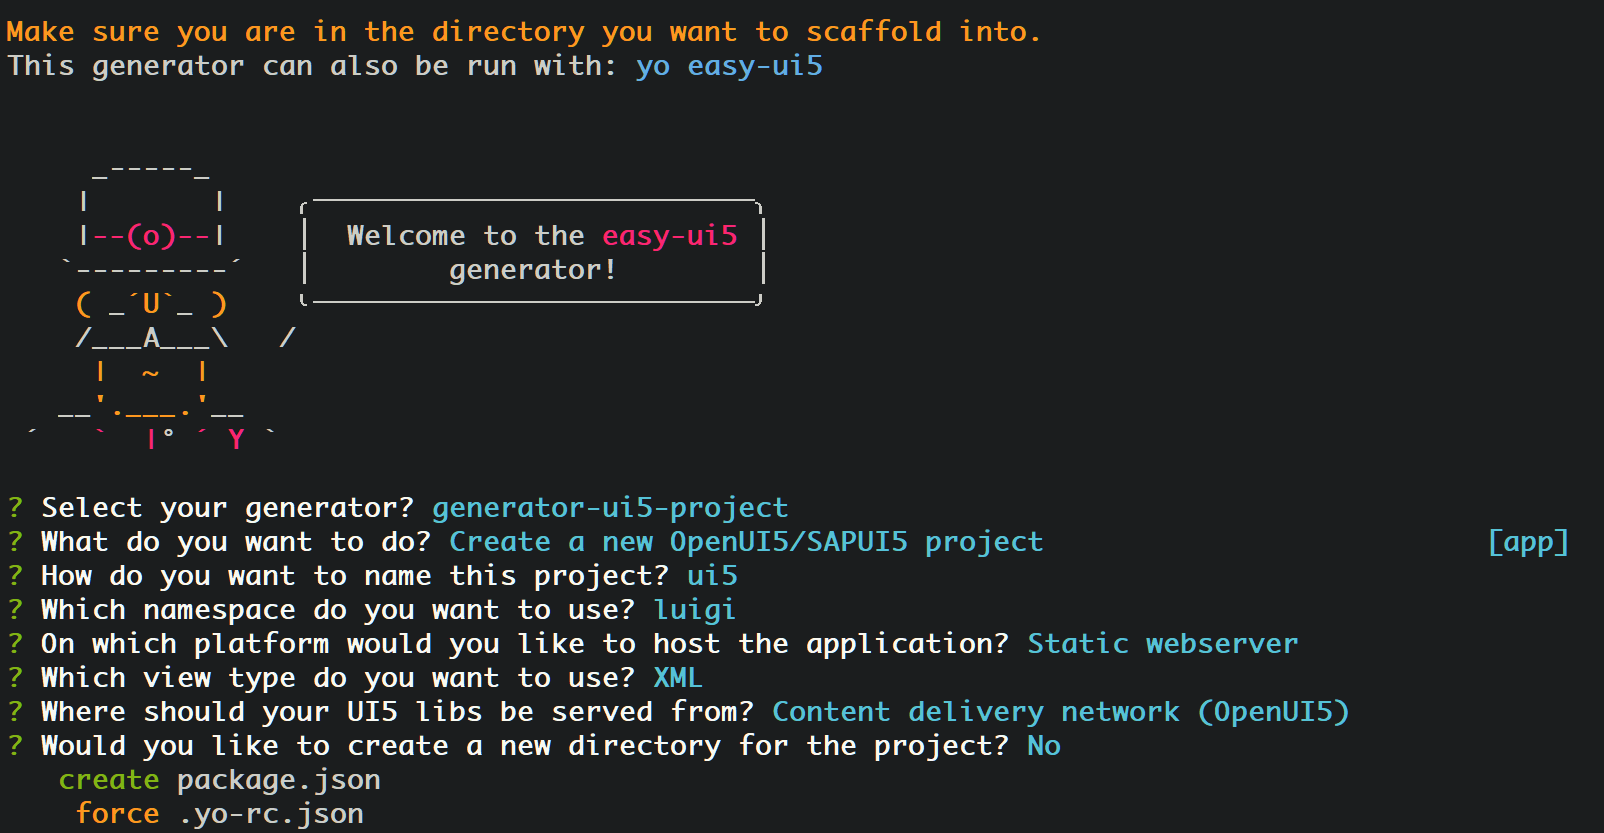
命令行 npm i create-react-app:
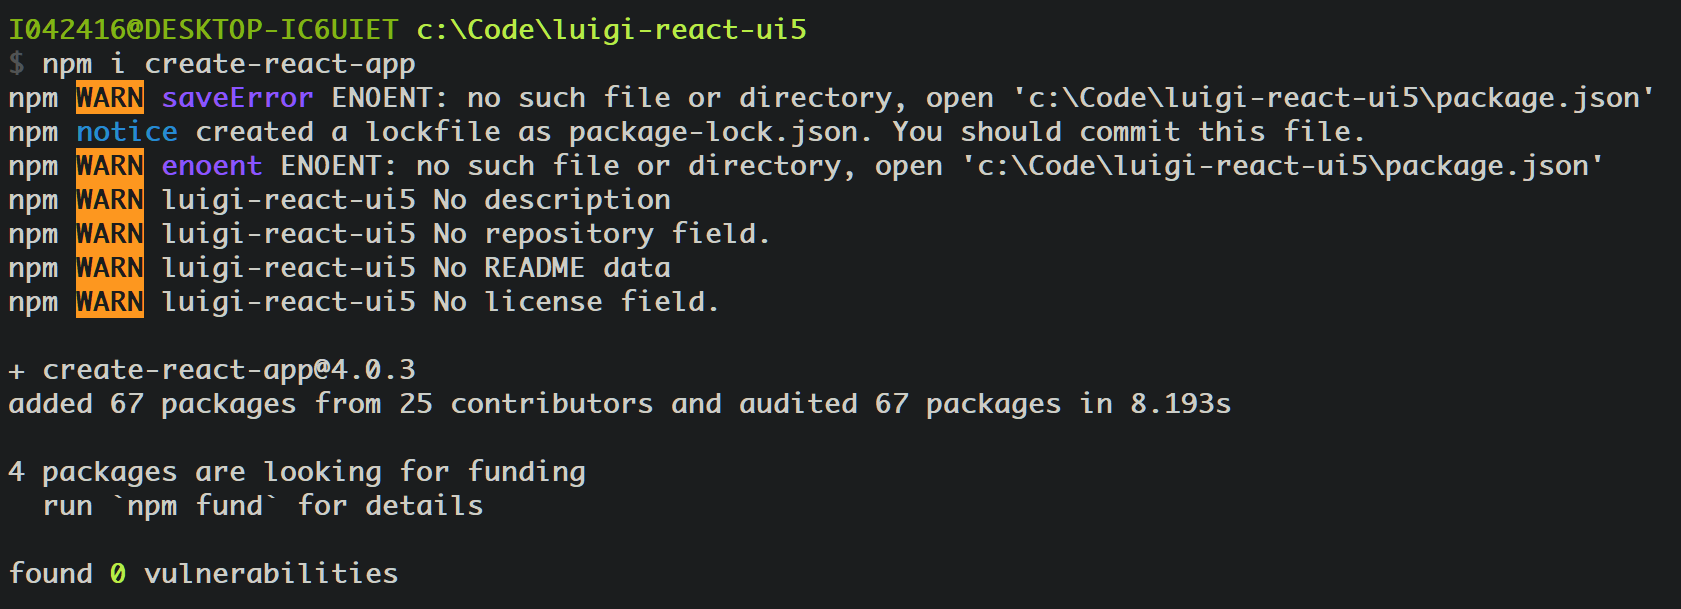
然后是命令行:npx create-react-app react-core-mf


Install dependencies
If you haven’t already done so, make sure you install SAP Fonts.
跳转到 core app 去:cd react-core-mf
安装依赖:
npm i -P @luigi-project/core @luigi-project/client fundamental-styles fundamental-react @sap-theming/theming-base-content react-router-dom
npm i copy-webpack-plugin webpack webpack-cli @babel/core @babel/preset-env babel-loader --save-dev
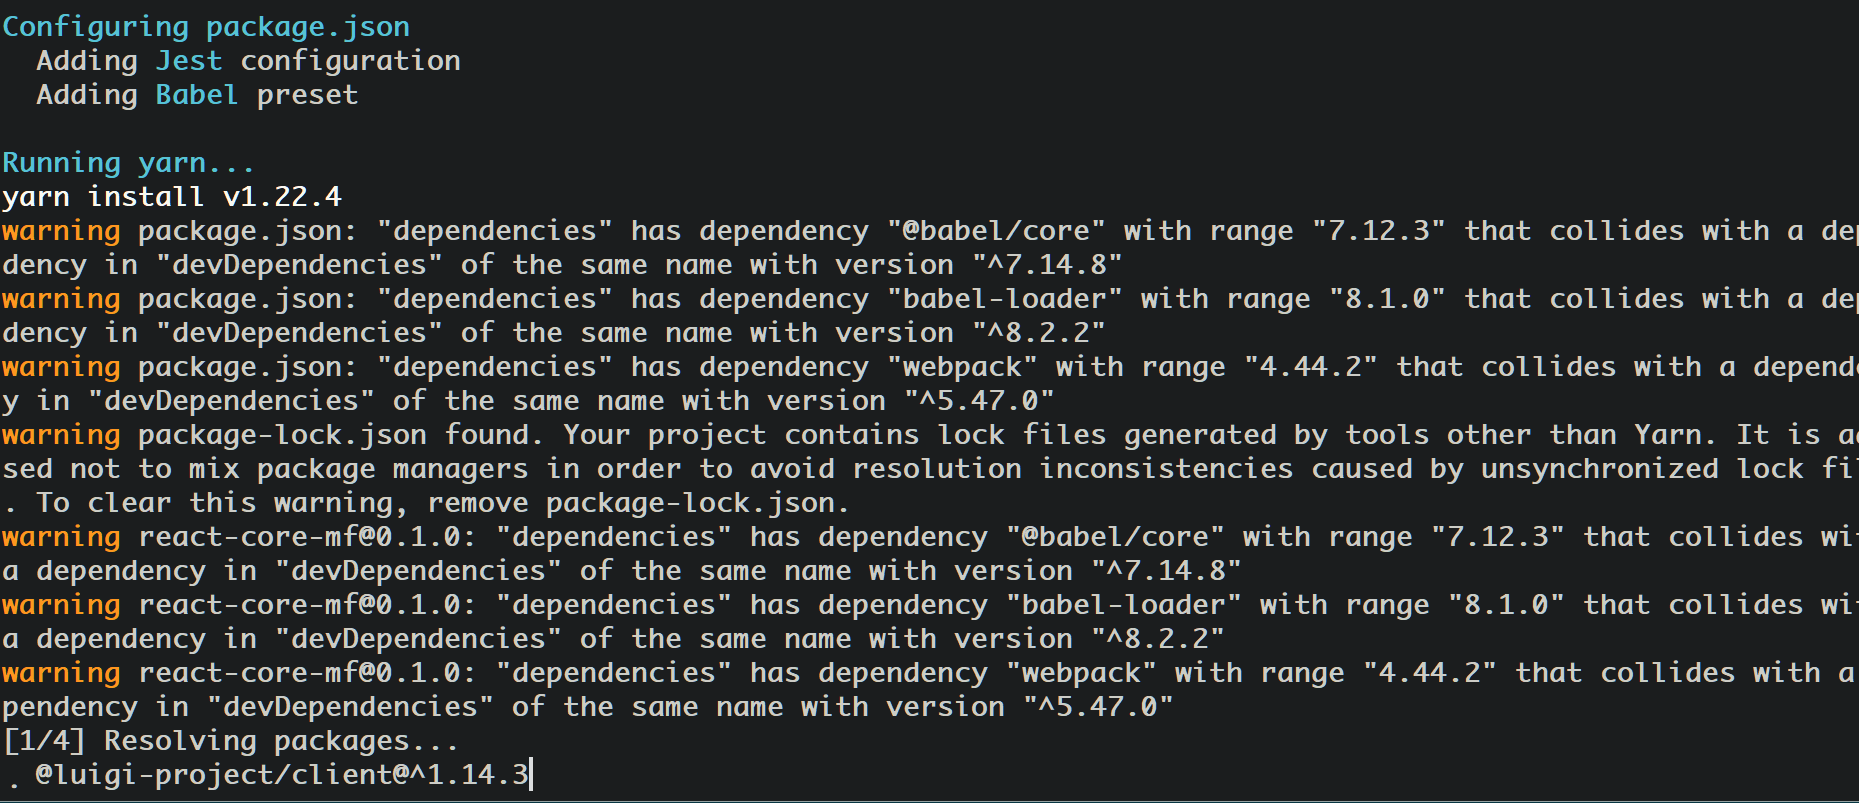
Create UI5 micro-frontend
创建一个 ui5-mf 文件夹:

命令行创建 ui5 工程:
npm install -g yo generator-easy-ui5
Add a file with product data
在此步骤中,您将创建一个文件,其中包含有关您的购物应用中在售产品的信息。
在现实的项目实现中,这些数据将由数据库提供。但为简单起见,您将在 .json 文件中创建虚拟数据。该文件将由主应用程序和微前端使用。
Navigate to ui5-mf/uimodule/webapp/model and create a products.json file with the following content:
{
	"ProductCollection": [{
			"id": 101,
			"name": "Logitech Mouse",
			"price": 45.0,
			"stock": 80,
			"icon": "product",
			"currencyCode": "EUR",
			"orderQuantity": 2,
			"description": "LIGHTSPEED Wireless Gaming Mouse with HERO Sensor"
		},
		{
			"id": 102,
			"name": "Logitech Keyboard",
			"price": 50.0,
			"stock": 22,
			"icon": "product",
			"currencyCode": "EUR",
			"orderQuantity": 1,
			"description": "A physical keyboard that uses an individual spring and switch for each key. Today, only premium keyboards are built with key switches; however, they were also used in the past, such as in the Model M keyboard from IBM, which used buckling spring switches"
		},
		{
			"id": 103,
			"name": "HP Optical Mouse",
			"price": 35.0,
			"stock": 4,
			"icon": "product",
			"currencyCode": "EUR",
			"orderQuantity": 2,
			"description": "Utilizing the latest optical sensing technology, the HP USB Optical Scroll Mouse records precise motion."
		},
		{
			"id": 104,
			"name": "MacBook Pro",
			"price": 1299.0,
			"stock": 11,
			"icon": "laptop",
			"currencyCode": "EUR",
			"orderQuantity": 3,
			"description": "It features a touch-sensitive OLED display strip located in place of the function keys, a Touch ID sensor integrated with the power button, a butterfly mechanism keyboard similar to the MacBook, and four USB-C ports that also serve as Thunderbolt 3 ports."
		},
		{
			"id": 105,
			"name": "Magic Mouse",
			"price": 40.0,
			"stock": 20,
			"icon": "product",
			"currencyCode": "EUR",
			"orderQuantity": 6,
			"description": "The Magic Mouse 2 (Apple Magic Mouse 2), is a computer mouse developed and released by Apple Inc. It features a multi-touch acrylic surface for scrolling. ... The mouse features a lithium-ion rechargeable battery and Lightning connector for charging and pairing."
		},
		{
			"id": 106,
			"name": "Brother Printer",
			"price": 235.0,
			"stock": 24,
			"icon": "fx",
			"currencyCode": "EUR",
			"orderQuantity": 1,
			"description": "Our affordable, quality machines provide you with the optimal way to take care of all your printing needs. Shop for the right printer, all-in-one, or fax machine for your home or home office today."
		},
		{
			"id": 107,
			"name": "iPhone 11",
			"price": 835.0,
			"stock": 45,
			"icon": "iphone",
			"currencyCode": "EUR",
			"orderQuantity": 8,
			"description": "The iPhone 11 dimensions are 150.9mm x 75.7mm x 8.3mm (H x W x D). It weighs about 194 grams (6.84 ounces).It features a 6.1-inch all-screen LCD display and is powered by Apple new A13 bionic chip with Third-Generation Neural Engine."
		},
		{
			"id": 108,
			"name": "Google Pixel 3a",
			"price": 299.0,
			"stock": 54,
			"icon": "desktop-mobile",
			"currencyCode": "EUR",
			"orderQuantity": 7,
			"description": "At 5.6 inches, the Google Pixel 3a display is proportionate to the relatively small body of the phone – that is to say, it is rather small. The display is Full HD+ and OLED, with a resolution of 2220 x 1080, and because of the relatively small screen size the pixels per inch count is rather high at 441."
		},
		{
			"id": 109,
			"name": "PlayStation 4",
			"price": 330.0,
			"stock": 94,
			"icon": "video",
			"currencyCode": "EUR",
			"orderQuantity": 1,
			"description": "PS4 is the fourth home video game console produced by Sony Computer Entertainment and is compatible with the PlayStation 3. It was officially announced at a press conference on February 20, 2013 and launched on November 15, 2013."
		},
		{
			"id": 110,
			"name": "Dell Monitor",
			"price": 630.0,
			"stock": 20,
			"icon": "sys-monitor",
			"currencyCode": "EUR",
			"orderQuantity": 3,
			"description": "34'' U3419W Monitor, Display with stand Height adjustable (115 mm), tiltable (-5° to 21°), rotatable (-30° to 30°) Security slot (cable lock sold separately), anti-theft slot for locking to stand (for display). Includes: DisplayPort cable, HDMI cable, Power cable, Stand, USB 3.0 Type-A to Type-B cable, USB-C cable"
		}
	]
}
Prepare React app
此步骤为您的开发做好准备。 为了能够使用 webpack 并完全控制您的 React 应用程序,您需要触发 npm run eject 命令。
cd react-core-mf
执行下列命令行。 请注意,由于此命令的工作方式,npm run eject 可能会失败。如果出现错误,则需要在运行命令之前提交任何更改。
npm run eject
如果遇到下面的错误消息:

解决方案:
- git add .
- git commit -am “Save before ejecting”
之后重新执行 eject 命令,就成功了:
Add Luigi to index.html
In this step, you will let Luigi take control of the index.hmtl file - the entry point for your app.
编辑 react-core-mf/public/index.html 文件的内容为:
<!DOCTYPE html>
<html lang="en">
<head>
  <meta charset="utf-8" />
  <meta name="viewport" content="width=device-width, initial-scale=1" />
  <title>Luigi</title>
  <link rel="stylesheet" href="/luigi-core/luigi.css" />
</head>
<body>
<script src="/luigi-core/luigi.js"></script>
<script src="/luigi-config.js"></script>
</body>
</html>
Create micro-frontends template
在这一步中,您将创建另一个 HTML 文件,该文件将作为 React 创建 React 微前端的模板。
转到 react-core-mf/public 并创建一个名为 app.html 的新文件。 将此代码粘贴到文件中:
<!DOCTYPE html>
<html lang="en">
  <head>
    <meta charset="utf-8" />
    <meta name="viewport" content="width=device-width, initial-scale=1" />
    <title>React App</title>
  </head>
  <body>
    <div id="root"></div>
  </body>
</html>
Configure webpack
在这一步中,我们配置 webpack 并调整依赖项,以便更轻松地开发和构建应用程序。
修改 react-core-mf/config/webpack-config.js:

加上一行:
const CopyWebpackPlugin = require('copy-webpack-plugin');
删除这一行:
const ModuleScopePlugin = require('react-dev-utils/ModuleScopePlugin');
以及:

新的 plugin:
new CopyWebpackPlugin(
   {
    patterns: [
       {
         context: 'public',
         from: 'index.html',
         to: 'index.html'
       },
       {
         from: 'node_modules/@luigi-project/core',
         to: './luigi-core'
       }
     ]
   },
   {
     ignore: ['.gitkeep', '**/.DS_Store', '**/Thumbs.db'],
     debug: 'warning'
   }
 ),
 new HtmlWebpackPlugin(
     {
       inject: true,
       template: __dirname + '/../public/app.html',
       filename: 'app.html'
     }
 ),
Create Luigi configuration file
在这一步中,您将创建一个 Luigi 配置文件。 这是任何 Luigi 应用程序的中心点。 它允许您配置一致的导航和许多其他 Luigi 功能。
react-core-mf/public 目录下面新建一个配置文件:luigi-config.js.
在现实生活中,您可以为配置文件指定任何您想要的名称或创建多个文件。 唯一重要的是使用正确的 Luigi 参数和语法,这将在下一步中介绍。
Configure Luigi for “Home” node
借助与导航和常规设置有关的简单参数,您将创建您的第一个“主页”导航节点并使您的应用程序具有响应性。
这些是您将使用的 Luigi 导航参数:
- pathSegment - 添加到 URL 的文本段
- label - 导航中显示的节点的名称
- icon - 标签旁边显示的 SAP 图标
- viewUrl - 微前端的 URL
使用下面的代码,您将为您的页面配置标题,并使您的应用程序在移动设备上使用 responseNavigation 参数看起来更好:
/* eslint-disable no-undef */
Luigi.setConfig({
    navigation: {
      nodes: () => [
        {
          pathSegment: 'home',
          label: 'Home',
          icon: 'home',
          viewUrl: '/app.html#/home'
        }
      ]
    },

    settings: {
        header: {
          title: 'Luigi Application',
          logo: '/logo.png'
        },
        responsiveNavigation: 'simpleMobileOnly'
      }
    }
);
Create “Home” view
在这一步中,您将使用 React 创建您的第一个微前端(又名视图)。 这是一个带有欢迎信息的简单“主页”视图。
导航到 react-core-mf/src 并创建一个名为 views 的文件夹。
新建一个 Home.jsx 文件:
import React from 'react';
import { LayoutPanel } from 'fundamental-react';

export const Home = () => {
   return (
       <LayoutPanel>
           <LayoutPanel.Body>
               <h2>Welcome to Luigi - a micro-frontend framework</h2>
           </LayoutPanel.Body>
       </LayoutPanel>
   );
}
Configure router for “Home” view
在此步骤中,您将对 React 应用程序的入口点 index.js 进行更改。您将为上一步中创建的“主页”视图配置路由器,并导入 Luigi Client。
打开 react-core-mf/src/index.js 并将其内容更改为:
import React, { Component } from 'react';
import { render } from 'react-dom';
import { addInitListener } from '@luigi-project/client';
import { BrowserRouter as Router, Route } from 'react-router-dom';
import { Home } from './views/Home.jsx';
import './index.css';

class App extends Component {
 constructor(props) {
   super(props);
   addInitListener(() => {
     console.log('Luigi Client initialized.');
   });
 }
 render() {
   return (
     <Router basename={`/app.html#`}>
       <Route path="/home" component={Home} />
     </Router>
   );
 }
}

render(<App />, document.getElementById('root'));
Create more views with React
在这一步中,您将创建更多 React 微前端,包括产品列表和产品详细信息。
导航到 react-core-mf/src/views 并创建一个包含以下内容的文件 List.jsx:
import React from 'react';
import { MessageStrip, Avatar, LayoutPanel, LayoutGrid } from 'fundamental-react';
const NO_AVAILABLE_PRODUCT_MSG = 'Unfortunately, there is no available product at this moment.';
const panelStyle = { cursor: 'pointer' };
export const List = ({ items }) => (
(items.length === 0) ? <MessageStrip type='error'>{NO_AVAILABLE_PRODUCT_MSG}</MessageStrip>
: items.map(({id, name, price, icon, stock}) => {
return (
<LayoutPanel key={id} style={panelStyle}>
<LayoutPanel.Header>
<LayoutPanel.Head title={name} />
</LayoutPanel.Header>
<LayoutPanel.Body>
<LayoutGrid cols={2}>
<div>
<div>Price: €{price}</div>
<div>Stocks: {stock}</div>
</div>
<div><Avatar circle glyph={icon} size='s' /></div>
</LayoutGrid>
</LayoutPanel.Body>
</LayoutPanel>
)
})
);
Products.jsx:
import React from 'react';
import { List } from './List.jsx';
import { ProductCollection } from '../../../ui5-mf/uimodule/webapp/model/products.json';
import { LayoutPanel, LayoutGrid } from 'fundamental-react';

export const Products = () => (
   <section className="fd-section">
       <LayoutPanel>
           <LayoutPanel.Header>
               <h3>Items ({ProductCollection.length})</h3>
           </LayoutPanel.Header>
           <LayoutPanel.Body>
               <LayoutGrid cols={2}>
                   <List items={ProductCollection} />
               </LayoutGrid>
           </LayoutPanel.Body>
       </LayoutPanel>
   </section>
);

export default Products;
Add “Products” view to Luigi app
在这一步中,您将在 Luigi 中为“产品”微前端添加一个导航节点。
编辑 react-core-mf/public/luigi-config.js:
在导航中添加一个新的“产品”节点:
navigation: {
  nodes: () => [
    {
      pathSegment: 'home',
      label: 'Home',
      icon: 'home',
      viewUrl: '/app.html#/home',
      children: [{
        pathSegment: 'products',
        label: 'Products',
        icon: 'list',
        viewUrl: '/app.html#/products'
      }]
    }
  ]
}
Step 12: Add “Product Detail” view to Luigi app
在此步骤中,您将向应用程序添加 ProductDetail.jsx 视图。 您将能够通过 Luigi 动态参数显示每个产品的详细信息,在本例中名为 :id。
文件 luigi-config.js 的内容为:
/* eslint-disable no-undef */
Luigi.setConfig({
    navigation: {
      nodes: () => [
        {
          pathSegment: 'home',
          label: 'Home',
          icon: 'home',
          viewUrl: '/app.html#/home',
          children: [{
            pathSegment: 'products',
            label: 'Products',
            icon: 'list',
            viewUrl: '/app.html#/products'
          }]
        },
        {
          pathSegment: 'products',
          label: 'Products',
          icon: 'list',
          viewUrl: '/app.html#/products',
          keepSelectedForChildren: true,
          children: [{
              pathSegment: ':id',
              viewUrl: '/app.html#/productDetail/:id'
          }]
        }
      ]
    },

    settings: {
        header: {
          title: 'Luigi Application',
          logo: '/logo.png'
        },
        responsiveNavigation: 'simpleMobileOnly'
      }
    }
);
Step 13: Use Luigi link manager for routing
在这一步中,我们将使用 Luigi 来提供微前端的路由,而不是使用 React。 Luigi Client 的 linkManager 功能是导航到每个产品的 id 页面的最简单方法。
华为开发者空间发布
让每位开发者拥有一台云主机
- 点赞
- 收藏
- 关注作者
评论(0)